How to Delete a File from the Command Prompt

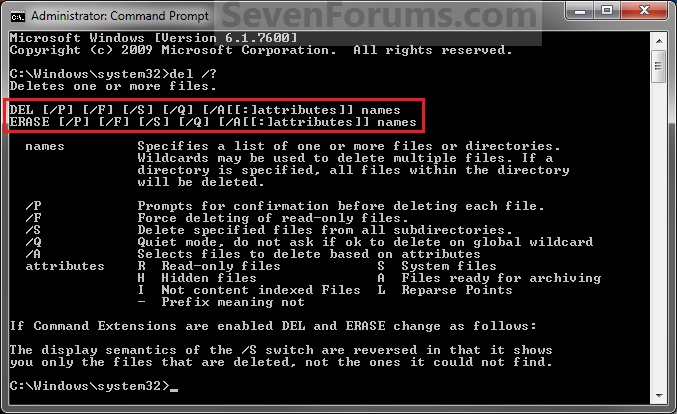
EXAMPLE: DEL and ERASE Command
NOTE: You can use either the DEL or ERASE command in the command prompt. They are the same command.
File - Delete from Command Prompt-about_del.jpg
2. To Use a Elevated Command Prompt in Windows
NOTE: This will allow you to delete any file(s) on the computer.
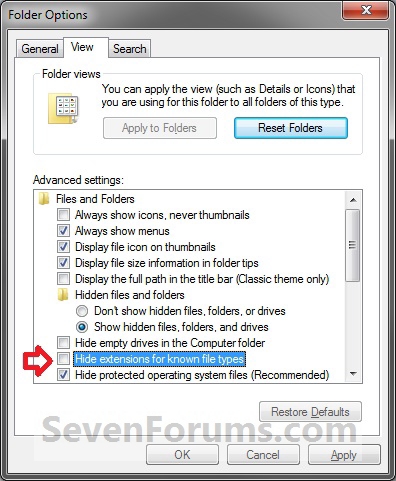
A) Open Folder Options, uncheck the Hide extensions for known file types box, and click on OK. (see screenshot below)
File - Delete from Command Prompt-folder_options.jpg


C) Go to step 5.
3. To Use a Command Prompt in Windows
NOTE: This will only allow you to delete any file(s) in your user folders.
A) Open Folder Options, uncheck the Hide extensions for known file types box, and click on OK. (see screenshot below)
Click image for larger version

Name: Folder_Options.jpg
Views: 951
Size: 138.0 KB
ID: 47916
B) Open a command prompt.

C) Go to step 5.
4. To Use a Command Prompt at Boot
NOTE: This will allow you to delete any file(s) on the computer.
A) Open a command prompt at boot.

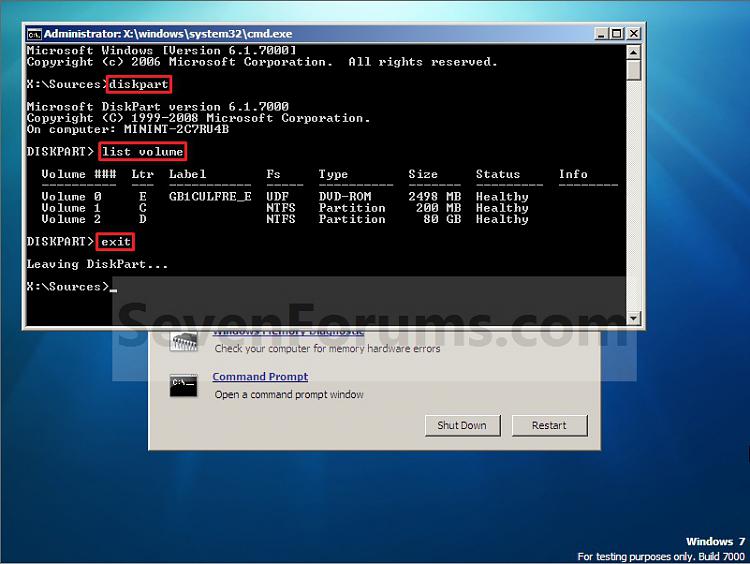
B) In the command prompt, type diskpart and press Enter. (see screenshot below)

C) In the command prompt, type list volume and press Enter. (see screenshot below)
NOTE: This will let you see what the drive letter is for the drive that you want to delete the file in since it may not always be the same drive letter that it is in Windows.

D) After making note of the drive letter, type exit and press Enter. (see screenshot below)
File - Delete from Command Prompt-command-1.jpg
E) Go to step 5.
5. Do step 6, 7, 8, 9, or 10 for how you would like to delete your file(s).

6. To Delete a Specific File in Command Prompt
A) In the command prompt, type the command below and press enter.
NOTE: Substitute Full Path of File with extension within quotes below with your files's full path and name with the extension included within quotes instead.

Code:
DEL /F /S /Q /A "Full Path of File with extension"
NOTE: For example, if I wanted to delete a text file named File with the file extension .txt on my desktop, I would type this command below.

Code:
DEL /F /S /Q /A "C:\Users\UserName\Desktop\File.txt"
B) Go to step 11.
7. To Delete All Files in a Folder without Confirmation in Command Prompt
NOTE: This will not ask you if it's ok (Y/N) to delete each file when deleting all files in a folder and the folder's subfolders.
A) In the command prompt, type the command below and press enter.
NOTE: Substitute Full Path of Folder within quotes below with the full path of the folder that you want to delete all files in.

Code:
DEL /F /S /Q /A "Full Path of Folder\*"
NOTE: For example, if I wanted to delete all files in my D:\Projects folder and subfolders, I would type this command below.

Code:
DEL /F /S /Q /A "D:\Projects\*"
B) Go to step 11.
8. To Delete All Files in a Folder with Confirmation in Command Prompt
NOTE: This will ask you if it's ok (Y/N) to delete each file when deleting all files in a folder and the folder's subfolders.
A) In the command prompt, type the command below and press enter.
NOTE: Substitute Full Path of Folder within quotes below with the full path of the folder that you want to delete all files in.

Code:
DEL /P /F /S /A "Full Path of Folder\*"
NOTE: For example, if I wanted to delete all files in my D:\Projects folder and subfolders, I would type this command below.

Code:
DEL /P /F /S /A "D:\Projects\*"
B) Go to step 11.
9. To Delete All Files with a Specified File Extension in a Folder without Confirmation in Command Prompt
NOTE: This will not ask you if it's ok (Y/N) to delete each file when deleting all files with a specified file extension in a folder and the folder's subfolders.
A) In the command prompt, type the command below and press enter.
NOTE: Substitute Full Path of Folder within quotes below with the full path of the folder that you want to delete all files in. Substitute extension with the file extension of the type of files that you want to delete in the folder and it's subfolders.

Code:
DEL /F /S /Q /A "Full Path of Folder\*.extension"
NOTE: For example, if I wanted to delete all txt (text) files in my D:\Projects folder and subfolders, I would type this command below.

Code:
DEL /F /S /Q /A "D:\Projects\*.txt"
B) Go to step 11.
10. To Delete All Files with a Specified File Extension in a Folder with Confirmation in Command Prompt
NOTE: This will ask you if it's ok (Y/N) to delete each file when deleting all files with a specified file extension in a folder and the folder's subfolders.
A) In the command prompt, type the command below and press enter.
NOTE: Substitute Full Path of Folder within quotes below with the full path of the folder that you want to delete all files in. Substitute extension with the file extension of the type of files that you want to delete in the folder and it's subfolders.

Code:
DEL /P /F /S /A "Full Path of Folder\*.extension"
NOTE: For example, if I wanted to delete all txt (text) files in my D:\Projects folder and subfolders, I would type this command below.

Code:
DEL /P /F /S /A "D:\Projects\*.txt"
11. The file(s) should now be deleted.

How to Create Hidden User Account (Hide User Account from Welcome Screen) in Windows

  • Click on the start menu and type "Create User"


  • Select either "Create Standard User Account" or "Create Administrator User Account" (both will take you to the same exact screen, glitch?)


  • Now select either Administrator or Standard User.
    • Generally, people will be creating a hidden administrator account as a regular hidden user account is kind of powerless to do... anything... but I'll leave this up to you.
  • My Accounts name for this tutorial is HiddenkovAccountski


  • Click on Create Account. It will appear under the account management dialog.


  • The Account is not yet hidden. Giving it a devious slavic undertone does not yet trigger this feature. Windows 8?

  • Click on the start menu, type in regedit, press enter.


  • Navigate to HKEY_LOCAL_MACHINE\Software\Microsoft\Windows NT\CurrentVersion\Winlogon\SpecialAccounts\UserLis t\


  • If "UserList" does not exist, right click on SpecialAccounts, and click on New Key, then type in UserList and press enter.


  • You must now add your account-to-be-hidden here. To do this:
  • Right click on UserList, Select New > DWORD (32-bit) Value


  • Type the name of the account-to-be-hidden exactly. For example: HiddenkovAccountski


  • You're done. Simply delete this value to allow the account to reappear to the welcome screen.


What is a hidden user account useful for?

A Strictly Hypothetical Scenario:

Lets say you don't trust your girlfriend for some stupid reason (Like, She got you this watch and she had it engraved GophaKTorselv, and "KT" was the initials of her idiot ex boyfriend, Kristov Thompson who she dated for 3 years before you and you swear she's still thinking of him and hasn't ever really gotten over him...) so you want full access to her Laptops "User" directory, remotely... but she doesn't have her account password locked, so you can't use remote desktop or share files.

Mind you, the "User" directory contains My Documents, My Pictures, My Everything.

So, to give yourself remote access, you can use Advanced Sharing, remove "Everyone" from the share and add HiddenkovAccountski to have Full Control over the share. You can check it out whenever you want now!


PROCEDURE NO 2 :

In order to hide a user account (which also means create a hidden user account) in Windows XP, Vista, or Windows 7, just go to Control Panel User module and create an additional user as usually do (Control Panel -> User Accounts and Family Safety -> User Accounts in Windows 7 and Windows Vista). If you already have an existing user that wants to be made hidden, invisible or disappeared from Welcome Screen, then go straight to guide below.
  1. Run Registry Editor (RegEdit.exe).
  2. Navigate to the following registry key: HKEY_LOCAL_MACHINE\SOFTWARE\Microsoft\Windows NT\CurrentVersion\Winlogon\SpecialAccounts\UserList
    Special Accounts User List
    Note: If SpecialAccounts and UserList is not found, create new sub-key and name them accordingly.
  3. Select UserList, and in the right pane, right click on any blank space, and point to New -> DWORD (32-bit) Value.
  4. Name the new DWORD registry value name as the exact same name that match the name of the user account to be hidden. For example, if the user ID of the user account is John, the name the registry value as John.
  5. Double click on DWORD registry value, and set the value data to 0 in oder to hide the account from Welcome Screen. Tip: To display the user account on Welcome Screen again so that it’s visible again, delete the registry entry, or set the value data to 1.
  6. Exit Registry Editor.
  7. Log off or restart computer to make the change effective.
Tip: In order to login into Windows using an user account that has made hidden and invisible, just press Ctrl+Alt+Del to bring up Windows Logon dialog, and then type in the user name and password manually.

In Microsoft Outlook, how can I confirm delivery of messages I send?

Outlook 2010

To request a delivery receipt for all messages:
  1. From the File tab, select Options.

  2. In the left-hand column, select Mail. In the right portion of the window, scroll down to the "Tracking" section.

  3. Under "For all messages sent, request:", check Delivery receipt confirming the message was delivered to the recipient's e-mail server.
To request a delivery receipt for a single message:
  1. While you are composing a new message, replying to a message, or forwarding a message, click the Options tab.

  2. In the "Tracking" section, click "Request a Delivery Receipt".

  3. Send your message when ready.

Outlook 2007, 2003, or 2002

To request a delivery receipt for all messages:
  1. From the Tools menu, select Options... .

  2. Under the Preferences tab, click Email Options... . Under "Message handling", click Tracking Options... .

  3. Under "For all messages I send, request:", check delivery receipt.
Using Outlook 2007, to request a delivery receipt for a single message:
  1. While you are composing a new message, replying to a message, or forwarding a message, from the Ribbon, click the little arrow in the bottom right-hand corner of the Options section.

  2. Under "Voting and Tracking options", check Request a delivery receipt for this message. Click Close.

  3. Send your message when ready.
Using Outlook 2003, to request a delivery receipt for just one message:
  1. While you are composing a new message, replying to a message, or forwarding a message, from the View menu, select Options.

  2. Check Request a delivery receipt for this message. Click Close.

  3. Send your message when ready.

How to ensure my email is read by recipient?

You can request a read receipt in Outlook to ensure your message is read by recipient. You will receive a message notification as each message is read.

To be notified about all messages

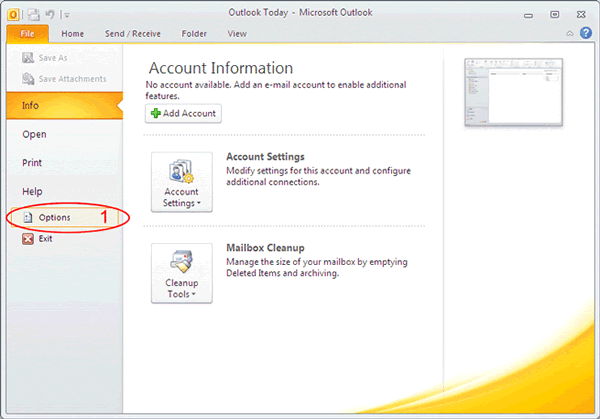
  1. On the File menu, click "Options" click "Options" on the File menu
  2. Click "Mail" of Outlook options
  3. Check the checkbox "Read receipt confirming the recipient viewed the message"
  4. Click "OK" Check the checkbox "Read receipt confirming the recipient viewed the message"

    To be notified about a single message

  5. In Outlook, click "New E-mail" to create new mail message In Outlook, click "New E-mail" to create new mail message
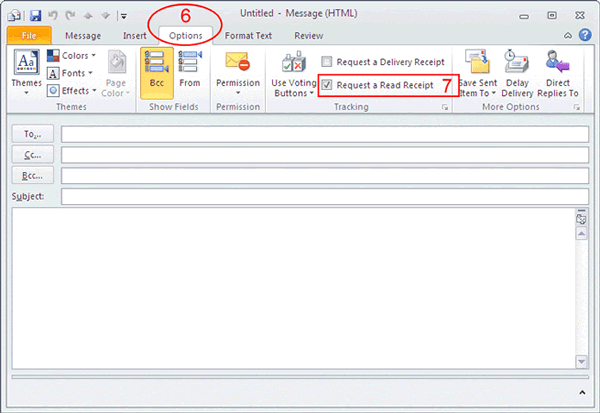
  6. Click "Options"
  7. Select the "Request a Read Receipt" check box Select the "Request a Read Receipt" check box


procedure no 2 :

After sending the email, sometime it becomes a frantic need to know when the recipient will start reading it, Outlook has an intrinsic feature which lets you know immediately when the person starts reading your message. By using Tracking, you can track down the email. This post elaborates how you can enable this feature.


Launch Outlook 2010, and from Home tab, click New E-mail.
outlook new mail
Navigate to Options tab, and From Tracking pane enable Request a Read Receipt option, now click Send to send it to recipient.
Mail 1'
By enabling this option, the recipient will be asked if he is willing to send the receipt back to the sender.
notification to ask
Upon clicking Next, Outlook will send a receipt containing time of reading mail back to the sender, with the same subject (RE). You will also notice on receiving receipt that, there is a small icon will be appeared adjacent to the Flag graphic, representing that, it is only the receipt, not the reply from the recipient.
IMP 1
On opening the receipt, it will be showing the time/date of mail, when it was sent and when it was read.
back emal 1

Single email delivery receipt for outlook 2007 & 2010

Setting delivery receipt

Step 1: New e-mail message

·
Start up Outlook 2007.
·
Open a new e-mail message by clicking New.
New mail

Step 2: Request a delivery receipt

·
Click on the Options tab at the top of your screen.
·
Select Request a Delivery Receipt.
·
Write and send your message in the usual way.
Request a delivert receipt
N.B.: Unfortunately, not all recipient e-mail servers support this service. If you want to be 100% certain that your e-mail has been received, in the e-mail that you send you should ask the recipient to confirm receipt.

SETTING DELIVERY RECEIPT

Step 1: New e-mail message

·
Start up Outlook 2010.
·
Open a new e-mail message by clicking New E-mail
New e-mail message

Step 2: Request a delivery receipt

·
Click the Options tab at the top of your screen.
·
Select Request a Delivery Receipt.
·
Write and send your message in the usual way.
Options
N.B.: Unfortunately, not all recipient e-mail servers support this service. If you want to be 100% certain that your e-mail has been received, in the e-mail that you send you should ask the recipient to confirm receipt.

VNC Server configuration for linux

Check what's installed
First check if you already have them installed on your system, open a terminal and type:
[root@localhost ~]# rpm -qa | grep -i vnc*
vnc-server-4.1.2-14.el5_3.1
vnc-4.1.2-14.el5_3.1
If package does not exist then need to install this package
[root@localhost ~]# yum install vnc* -y
[root@localhost ~]# vim /etc/sysconfig/vncservers
VNCSERVERS="2:root"
 VNCSERVERARGS[2]="-geometry 800x600 -depth 16 "
The important part is the VNCSERVERS="1:root", this sets up a users for the vnc server, you can add as many as you like here. The VNCSERVERARGS[1]
line refers to the arguments for user 1, in this case the only user. Geometry sets the size and depth sets the colour depth, you can adjust these to
suit your preferences but in my case the client machine has a resolution of 1024x768 and the depth 16 makes the connection a bit faster since the less
Setting a password
To add some security we need to add a password that must be given before a connection can be established, open a terminal and type:
[root@localhost ~]# vncpasswd
Password:
Verify:
[root@localhost .vnc]# vim /root/.vnc/xstartup
unset SESSION_MANAGER
exec /etc/X11/xinit/xinitrc
[root@localhost .vnc]# chmod 770 /root/.vnc/xstartup
[root@localhost .vnc]# /etc/init.d/vncserver restart
Shutting down VNC server: 2:root                           [FAILED]
Starting VNC server: 2:root xauth:  creating new authority file /root/.Xauthority

New 'localhost.localdomain:2 (root)' desktop is localhost.localdomain:2

Starting applications specified in /root/.vnc/xstartup
Log file is /root/.vnc/localhost.localdomain:2.log

                                                           [  OK  ]

Now we  will access VNC Server with TightVNC Server software :


For exit press SHIFT+CTRL+ALT+F
Stopping the vncserver
There are two ways to stop the server, either as root:
$ /sbin/service vncserver stop
Shutting down VNC server: 1:bobpeers                        [  OK  ]

or you can explicitly kill a particular session without being root:
$ vncserver -kill :1
Killing Xvnc process ID 13728

Just replace the 1 with the vnc session you wish to stop.