How to controll system startup by using Msconfig in Windows 7

1. Click on the Windows 7 start icon in the bottom left corner of your screen.
Windows 7 start logo
2. Type MSCONFIG in the search box and then either press enter on your keyboard or double-click on the MSCONFIG program that appears in the search results.
Search: MSCONFIG
4. Windows 7 will launch Microsoft's System Configuration Utility. Click on the Startup tab.
MSCONFIG in Windows 7
4. This takes you to a page with a list of "startup items." Startup items are programs that are automatically loaded every time you turn on your computer. Some startup programs are absolutely necessary, others are simply a waste of RAM.
Windows 7 MSCONFIG startup tab
In Windows 7, allmost all of Windows' essential programs are loaded through something called "Windows Services." This means that most of the startup items you see in Windows 7 are completely optional and can be turned off. However, a good rule of thumb is to disable only those programs that you recognize and don't need to have running all the time. When in doubt, leave it on. Or, better still, check out Paul "PacMan" Collins' huge "Startup Applications" list at

5. Click on the OK button.
6. A message will pop up telling you that you must restart your computer before these changes will take effect. Click on "Restart" and your computer will automatically reboot.
Restart dialog box in Windows 7
7. That's it! Your computer should now boot faster and crash less.
And if you ever want to turn on any of the startup items you disabled with MSCONFIG, just run MSCONFIG again.

How do I clear the Recent Documents list in Windows 7

Recent Items listed in the start menu are stored in:
%appdata%\Microsoft\Windows\Recent

To delete, you can either right-click on Recent Items from the start menu and select Clear recent items list or you can empty the folder from inside Windows Explorer.
Recent items listed in jump lists are stored in:
%appdata%\microsoft\windows\recent\automaticdestinations

To delete, empty the folder from inside Windows Explorer, or from the command prompt using
del %appdata%\microsoft\windows\recent\automaticdestinations\*


Recent documents for Windows 7 is located under here,
Windows 7 Recent Documents Location
Look at above location when you browse other users’ data over network or as separate disk.
Delete all files ( It is just shortcuts) from this location to clear your recent documents in Windows 7.

The Disk cleanup Tool will helps in removing all the unwanted files present in the PC.


• Click on start menu.


• Type “Disk Cleanup” in search box in start menu and hit enter.


image2

• Select the drive which you wish to cleanup.


image3

• Click ok.


image4

• Now the scan will take place and it require few minutes for the completion.


image5

• Select the type of file which you require to delete.


image6

• Click ok.


image7

• Click “Delete files” for the confirmation.


image8

• Now you can view the process window which will remove all the unwanted files.


image9

That’s it, the unwanted files can be removed by using the tools and it helps in increasing the disk space.


Where are Windows 7 temporary files stored and how to delete them


delete Windows filesTo view temp files press simultaneously win logo+r key to open run box. Type in %temp% and you are going to see the list of your files that can be delete.d Simply select them all and press delete key.

Sometimes you are not going to be able to delete a file or two which may be locked due to being in use by Windows Explorer. Do not bother about it just skip that one. 

How to Delete Prefetch Files in Windows 7

The steps:

1. Open Windows Explorer.

2. Click the 'Organize' dropdown button.

3. Select 'Folder and search options'.

Prefetch
4. Click the 'View' tab.

5. Find and then mark 'Show hidden files, folders and drives', click 'Apply' and then click 'OK' to close the window.

Prefetch
6. Now go to your Local Disk (usually Drive C:) C: > Windows > Prefetch.

Prefetch
7. Delete all .pf files. Please be extra careful. Delete .pf files only.

PrefetchPrefetch
8. Now, go back from Step 1 to 4.

9. Mark 'Don't show hidden files, folders or drives', click 'Apply' and then click 'OK' to close.

10. Empty the trash bin with CCleaner.

Restart Windows 7 and it will gain some performance.

How To Disable File Sharing And Network Discovery In Windows 7

Step 1

Click the Windows Start Menu Orb and Type advanced sharing into the search box, then Press Enter or Click the Manage advanced sharing settings program link.
manage advanced sharing settings in Windows 7

Step 2

In the advanced sharing settings window there are a few different settings to change.  Depending on which type of connection you want to change them for you’ll need to select whether it is a “Home or Work” or a Public connection.  If you are unsure, the network profile you are using right now will be marked as “current profile.”

Mark the bubble for the following settings:
  • Turn off network discovery
  • Turn off file and printer sharing
  • Turn off Public folder sharing
Once you’ve done this be sure to Click Save Changes or they won’t take effect.
disable sharing in windows 7
Now you’re practically invisible to other computers on the network.  Of course you’re never 100% safe however, one more layer has been thrown up between your data and the bad guy.  Groovy Baby!

Map a Network Drive: Windows XP & Windows 7

1. Open a command prompt.
2. In the command prompt, type in the command below for what you want to do and press Enter.
net use Z: \\ComputerName\ShareFolderName 
net use * \\ComputerName\ShareFolderName
  • Substitute Z: in the first command below with a unused drive letter you want to be given to the mapped network drive in your Computer window.
  • You can use * in the second command below to have Windows 7 automatically assign a unused drive letter to the mapped network drive in your Computer window starting from Z: up.
Example : 

C:\Users\saiful>net use Z: \\192.168.49.244\Saiful
The command completed successfully.


C:\Users\saiful>net use * \\192.168.49.244\Saiful
Drive Y: is now connected to \\192.168.49.244\Saiful.
The command completed successfully.

Method Two

From within the Computer Window
1. Open the Start Menu and click on the Computer button on the right dark side.

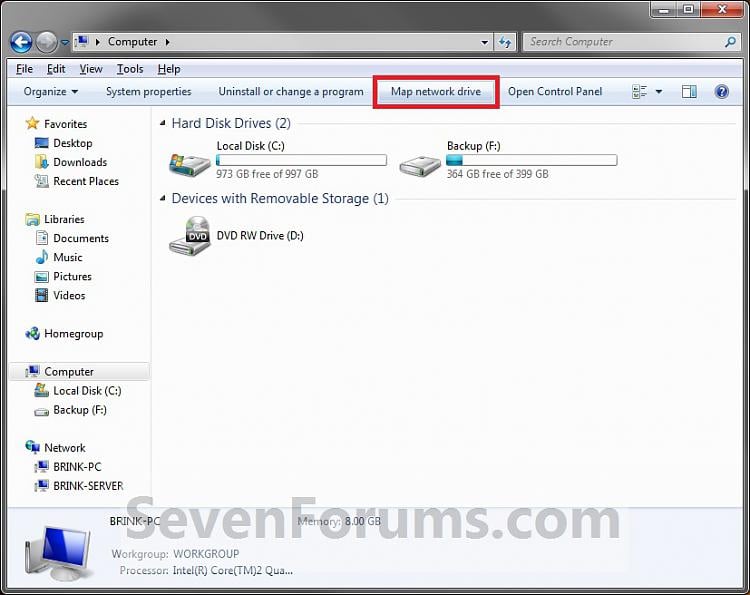
2. Click on the Map network drive toolbar button. (see screenshot below)
Map Network Drive-step1.jpg
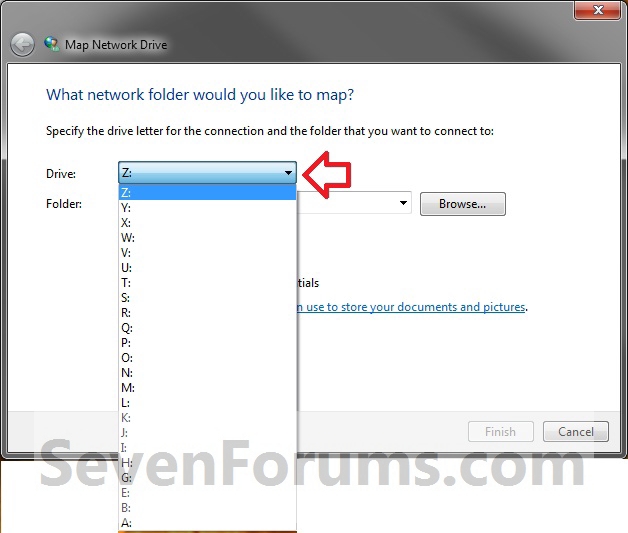
3. Select a drive letter that you want to be assigned to this mapped network drive. (see screenshot below)
Map Network Drive-step2.jpg
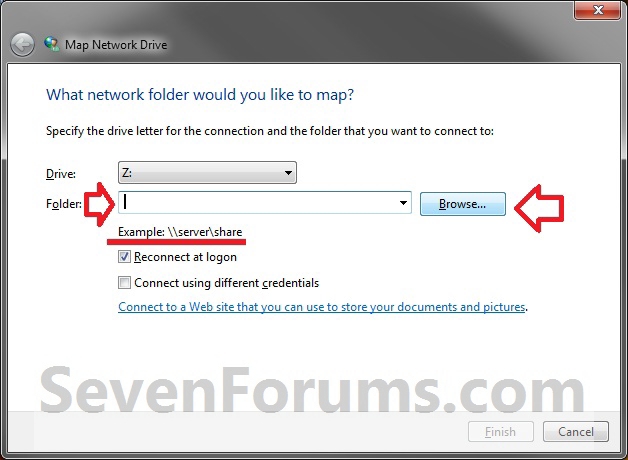
4. Click on the Browse button. (see screenshot below)
Map Network Drive-step3.jpg
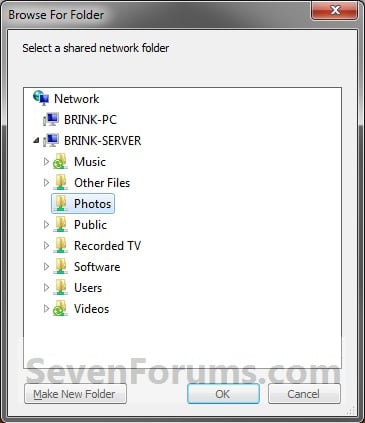
5. Select a listed shared folder on your computer OR a shared network folder that you want to have mapped as a drive, then click on OK. (see screenshot below)
Map Network Drive-step4.jpg
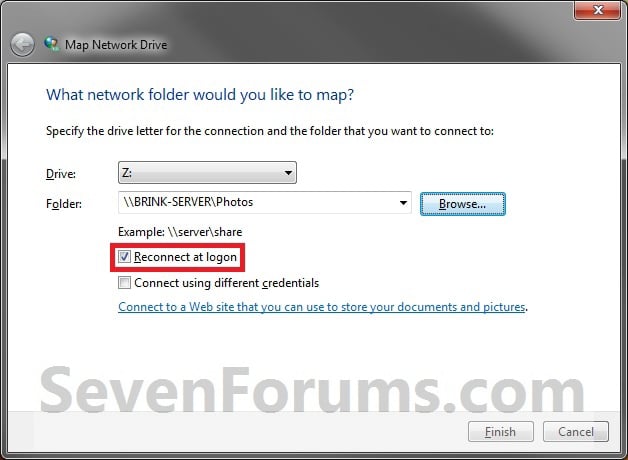
6. If you want to always have the map network drive available in the Computer window, then check the Reconnect at logon box. (see screenshot below)
NOTE: If you do not check the Reconnect at logon box, then the mapped network drive in Computer will be disconnected (unmapped) automatically whenever you log off or restart the computer next.

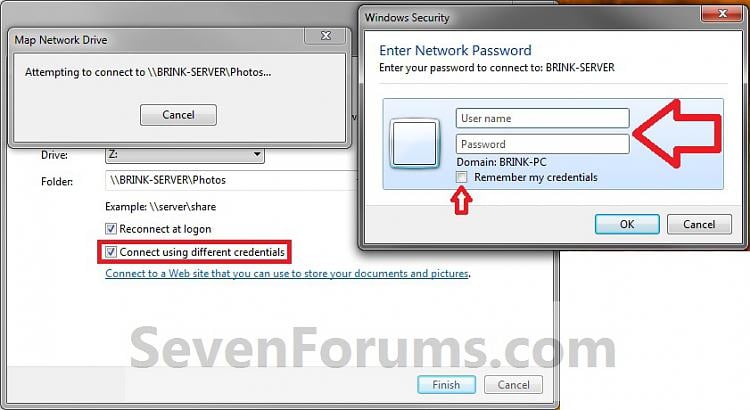
7. If you want to log on to the network for the shared network folder with a different user name and password than what you already have set for this network connection, then check the Connect using different credentials box. (see screenshot below step 9)
NOTE: Normally you would leave this option unchecked unless you wanted to log on as a different user on the network than the default one you already have set up.
Map Network Drive-step5.jpg
8. Click on Finish. (see screenshot below step 6)

9. If you checked the Connect using different credentials box in step 7, then you will now be prompted to enter the user name and password that you want to use instead to log on to the network with. If you want to be automatically logged on each time you open the mapped network drive, then check the Remember my credentials box. Click on OK after entering them. (see screenshot below)
NOTE: If not, then skip this step and continue to step 10.

Note   Note
If you are mapping drives/folders on a NAS, then you will need to use something like User-name@User-PC as your username instead + password.
Map Network Drive-step6b.jpg
10. You will now have a mapped network drive of this shared folder or shared network folder in Computer. (see screenshot below)
Click image for larger version

Name: Step6.jpg
Views: 1571
Size: 219.0 KB
ID: 43736


OPTION TWO

To Unmap a Network Drive

NOTE: This will disconnect the mapped network drive to only remove it from the Computer window. It will not delete the shared folder or shared network folder.


Method One

Using the Command Prompt
1. Open a command prompt.

2. In the command prompt, type in the command below and press Enter.


NOTE: substitute Z: in the command below with the actual drive letter of the mapped network drive that you want to unmap (remove) from your Computer window.
  • net use Z: /delete
3. When finshed, close the command prompt. The mapped network drive shoud now be removed from your Computer window.


Method Two

From within the Computer Window
1. Open the Start Menu and click on the Computer button on the right dark side.

2. Right click on the mapped network drive that you want to unmap, and click on Disconnect. (see screenshot below)
Map Network Drive-step7.jpg
3. The mapped network drive is now unmapped, and will no longer show in the Computer window.

Map a Network Drive: Windows XP

This page describes how to map network drive on the School of Medicine Network with a Windows XP machine.
  1. Select the Tools menu, then select Map Network Drive.

    Map Network Drive

  2. Under Drive, choose a drive letter from the pull-down menu. Do not select 'Reconnect at logon' if you are working on a public or non-personal computer.

    To connect to your department shared drive (aka: S: drive):

    \\med-core02s.med.wayne.edu\Shared
    Folders\

    To connect to your home directory (aka: H: drive):

    \\med-core02u.med.wayne.edu\User
    Folders\


  3. Click Finish.

    Please Note:  If a window ever pops up asking for your username and password, make sure for username you enter it as MED\username - username is your SoM login ID or the first part of your @med.wayne.edu email address.
  4. To disconnect your network drive go to: Tools > Disconnect Network Drive - select the drive you wish to disconnect.

Why remove the Map Network Drive option :

Though this process of mapping two devices eases the connectivity of two or more computers, it may be so that a user does not require this feature. Not being a part of a homegroup or not requiring to share any network, a user sees the “Map Network Drive” option as a useless extra feature in Windows that is as good as not present. Hence, he may want to remove this option from where it belongs .
The “Map Network Drive” option appears when a user right clicks on “Computer”. Clicking this starts the connecting process between two or more computers (the same process has to be run on all computers needed to be connected).

Removing and Restoring the Map Network Drive Option :

The “Map Network Drive” option in Windows can be removed by either editing the Windows Registry or by importing a registry file to be incorporated into the registry.
Editing the Windows Registry :
Editing the Windows Registry is a process to remove the “Map Network Drive” option in Windows. Since editing the registry is a process that involves even a small amount of risk, we recommend that you keep a backup of your current registry settings. Learn How to create a backup of your Windows Registry.
Now follow the steps below :
1. Click “Start” and then select “Run” or simply press “Windows Key + R” to open the run box.
2. The run box appears. Type in “regedit” and press ENTER. Confirm any User Control Account messages appearing to continue.
3. The Windows Registry Editor opens up. Navigate to the location
HKEY_CURRENT_USER\Software\Microsoft\Windows\CurrentVersion\Policies\Explorer.
4. On the right-hand-side of the Registry Editor box, right click on any blank space and create a new 32-bit DWORD value. Name it “NoNetConnectDisconnect”.

5. Right-click on the registry file just created and select to “Modify”.

6. Specify the DWORD value of the newly created registry value as 1.

7. Close the Registry Editor and reboot your system.
When the system reboots, it can be seen that the “Map Network Drive” option is removed. Right clicking on the “computer” icon shows no such option, unlike it used to do previously.

Restoring the “Map Network Drive” option can be done by simply changing the DWORD value of the created file from 1 to 0. It can also be done by deleting the file created.

Importing a Third Party Registry Hack :
The “Map Network Drive” option can be removed by simply incorporating a “.reg” file into the Windows Registry. This file named “RemoveMapNetworkDrive.reg” when added to the registry, acts as a registry hack which removes the option from your system. To use this hack, proceed in the steps mentioned below :
1. Download the file “RemoveMapNetworkDrive.reg” onto your system.
2. The file downloaded is a “*.zip” file. Extract it to retrieve the original “*.reg” files “RemoveMapNetworkDrive.reg” and “RestoreMapNetworkDrive.reg”.
3. Double click on the extracted file “RemoveMapNetworkDrive.reg” to incorporate it into the Windows registry. Confirm any messages appearing to complete the task.

4. After the file has been added to the registry, reboot your system.
On restarting the computer, we see that the “Map Network Drive” option has been removed when the “Computer” icon is right-clicked upon.
If you wish to restore the “Map Network Drive” option, just double click on the extracted file “RestoreMapNetworkDrive.reg” to add it to the registry. Confirm any appearing messages and reboot your system. The option is restored after the system restarts.