Creating a Group
To keep Alice's email address confidential you will need to create a second Group in the same way, with a name which indicates the email addresses contained are not to be distributed. In this example it is called Confidential.
Adding Members to a Group
As it says in the Group 'Properties' window there are three ways you can add 'Members' to a group, either:
Mailing to a Group
In the main window click the 'Create Mail' button, this opens a 'New Message' window as usual.
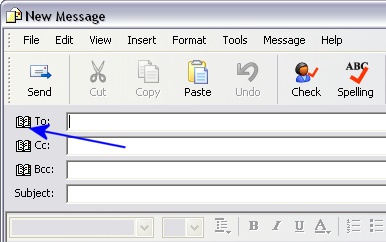
Click on the address book icon beside the 'To:' button (arrowed) to open a 'Select Recipients' dialog box.

In the 'Select Recipients' dialog there is a list of your contacts shown, along with a search field to help you find a contacts name. One way to quickly find the 'Kata Team' entry is to click on any name in the 'Contacts' list and type "k" or "ka", unless you have a huge contact list the 'Kata Team' group should now be in the list.
If all the team's addresses were to be confidential then the whole Group could be put in the "Bcc:" box. When the email is sent it will then appear to be sent "To: undisclosed-recipients".
Creating GroupsCreating your own Groups of email addresses is a handy function, as it allows you to send email to a pre-defined collection of people easily, without having to remember their names or email addresses. Whether you are on a server at work, trying to define a group of people to receive regular reports, or you want to set up a group at home to forward all your jokes to, this can save you a ton of time in the long run.
Part 1 – Creating your own Groups
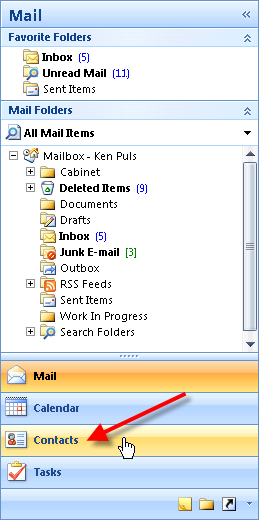
If you are in the email view, click the Contacts button in the left navigation bar on your screen:
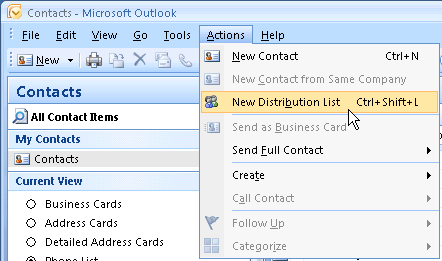
Now, you should be in the Contacts view. Choose Actions then New Distribution List (or press Ctrl+Shift+L)
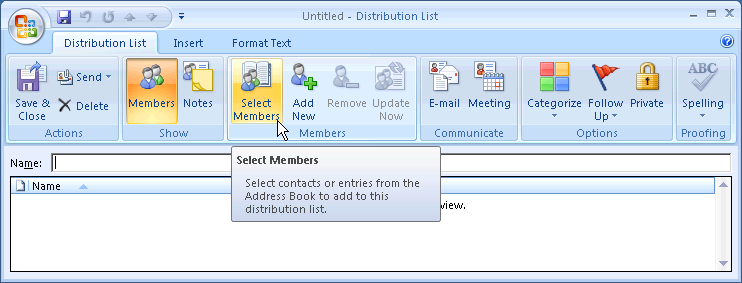
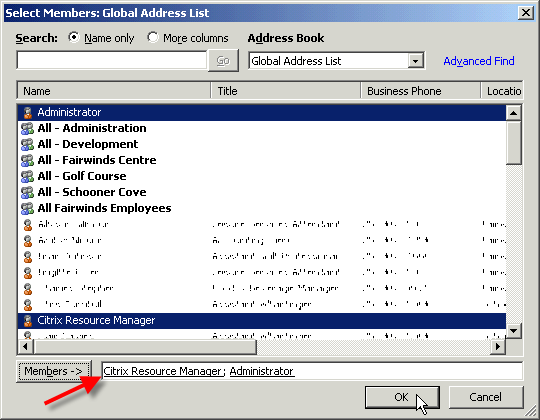
Next, you’ll want to choose Select Members from the Members group on the Ribbon.
I’ve doubled clicked both Administrator and Citrix Resource Manager accounts, at which point they show in the “Members ->” area at the bottom of the screen. (Pick someone you actually want to email.) Once you’ve got a nice list of people that you’d like to include in your group, click OK.
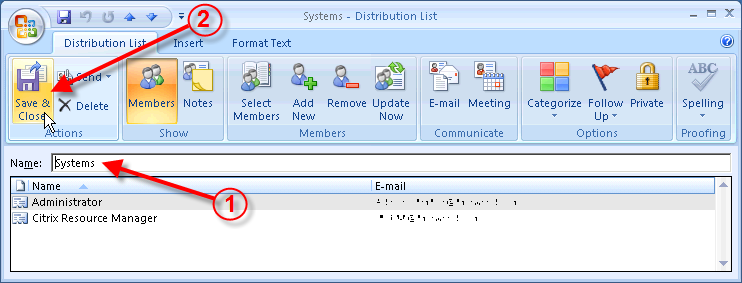
Next, give your group a name that makes sense, and the click the Save & Close button on the Actions group.
Part 2 – Emailing Your Group
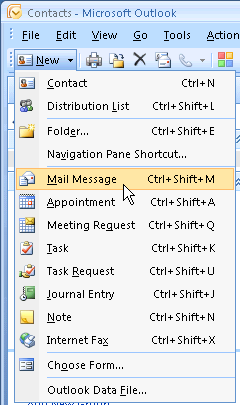
Okay, now the useful part… let’s send our group an email. From the New menu, choose Mail Message (or just press Ctrl+Shift+M to create a new mail message.)
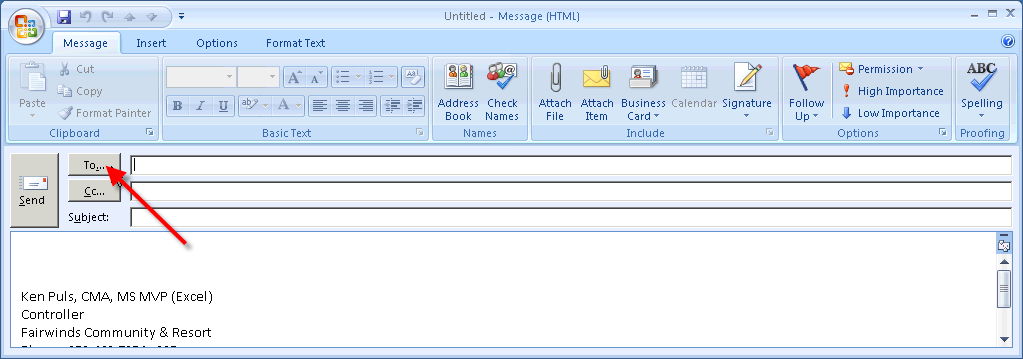
In the email message, click the To… button:
The secret to finding your new group is to click the drop down arrow and choose the address book that holds the group you created. (In this case Outlook Contacts instead of our Global Address List):
And there it is! Double click it to select it, then click OK.

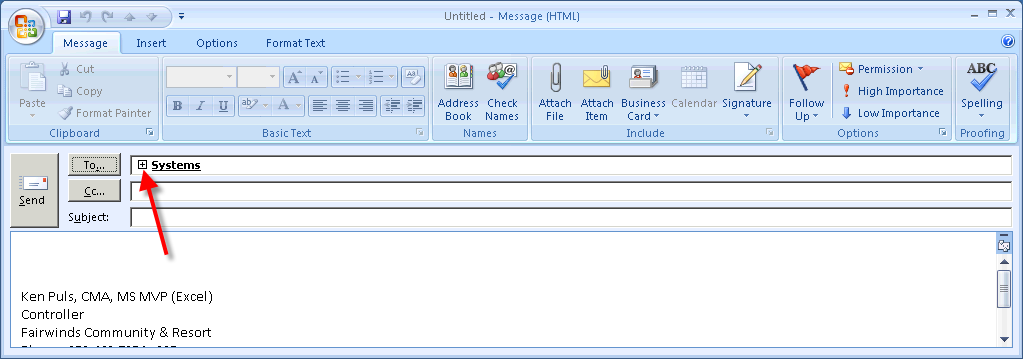
You’ll notice that your email is now addressed to the group. Now… do you remember who you put in the group? Okay, you probably do at this stage, but as time goes on, you may forget and want to verify it. (Or maybe it is your joke list, and you want to forward it to everyone except the person who just emailed the joke to you.) Do you see the little + sign just in front of the group name?
Go ahead and give it a click…
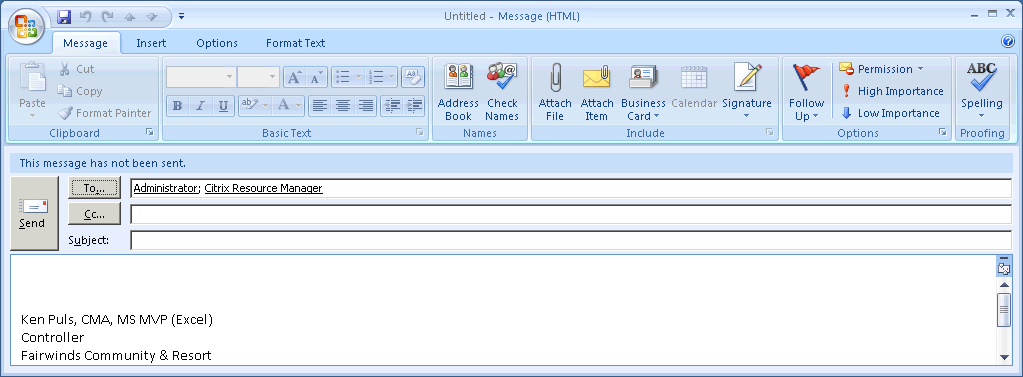
The email group automatically expands to show you the names of all of the members! You’ll never wonder who you’re sending email to again! And if you want to remove one, just highlight the name and press the delete key. It's just that easy!
Part 3 - Editing existing groups
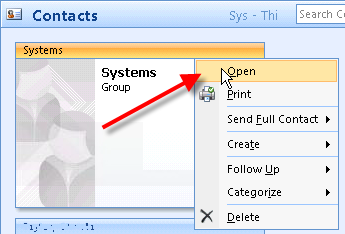
Assume now that months have gone by, and you want to make a change to your group… either adding or removing someone. How do you do it? The first step is to located the group in your contacts list. Once you’ve found it, right click it, and choose Open.
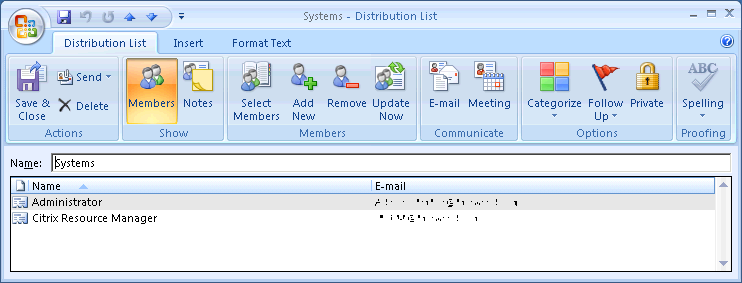
Your "Distribution List" will open, and show who the members are.
 Create Contact Groups
Open Outlook and click on New Items \ More Items \ Contact Group.

This opens the Contract Group window. Give your group a name, click on Add Members, and select the people you want to add from your Outlook Contacts, Address Book, or Create new ones.

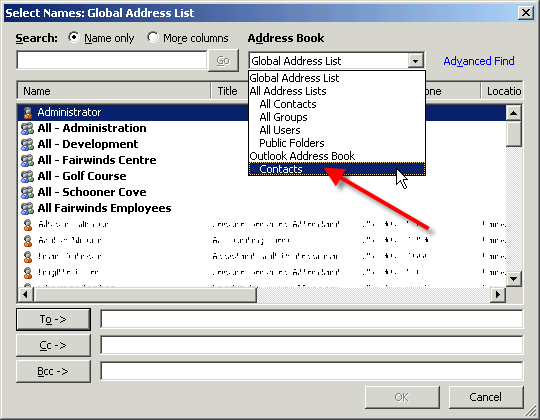
If you select from your address book you can scroll through and add the contacts you want. If you have a large amount of contacts you might want to search for them or use Advanced Find.

If you want to add a new email contact to your group, you’ll just need to enter in their display name and email address then click OK. If you want the new member added to your Contacts list then make sure Add to Contacts is checked.

After you have the contacts you want in the group, click Save & Close.
![sshot-2010-05-28-[21-42-01]](http://cdn.howtogeek.com/wp-content/uploads/2010/05/sshot20100528214201.png "sshot-2010-05-28-[21-42-01]")
Now when you compose a message you should be able to type in the name of the Contact Group you created…
![sshot-2010-05-28-[21-46-15]](http://cdn.howtogeek.com/wp-content/uploads/2010/05/sshot20100528214615.png "sshot-2010-05-28-[21-46-15]")
If you want to make sure you have everyone included in the group, click on the plus icon to expand the contacts. You will get a dialog box telling you the members of the group will be shown and you cannot collapse it again. Check the box not to see the message again then click OK.
![sshot-2010-05-28-[21-48-20]](http://cdn.howtogeek.com/wp-content/uploads/2010/05/sshot20100528214820.png "sshot-2010-05-28-[21-48-20]")
Then the members of the group will appear in the To field. Of course you can enter a Contact Group into the CC or Bcc fields as well.
![sshot-2010-05-28-[21-50-06]](http://cdn.howtogeek.com/wp-content/uploads/2010/05/sshot20100528215006.png "sshot-2010-05-28-[21-50-06]")
Add or Remove Members to a Contact Group
After expanding the group you might notice some contacts aren’t included, or there is an old contact you don’t want to be in the group anymore. Click on the To button…
![sshot-2010-05-28-[21-56-20]](http://cdn.howtogeek.com/wp-content/uploads/2010/05/sshot20100528215620.png "sshot-2010-05-28-[21-56-20]")
Right-click on the Contact Group and select Properties.
![sshot-2010-05-28-[21-58-43]](http://cdn.howtogeek.com/wp-content/uploads/2010/05/sshot20100528215843.png "sshot-2010-05-28-[21-58-43]")
Now you can go ahead and Add Members…
![sshot-2010-05-28-[22-01-08]](http://cdn.howtogeek.com/wp-content/uploads/2010/05/sshot20100528220108.png "sshot-2010-05-28-[22-01-08]")
Or highlight a member and remove them…when finished click Save & Close.
![sshot-2010-05-28-[22-01-30]](http://cdn.howtogeek.com/wp-content/uploads/2010/05/sshot20100528220130.png "sshot-2010-05-28-[22-01-30]")
If you need to send emails to several of the same people, creating Contact Groups is a great way to save time by not entering them individually. If you work in for a large company, creating Contact Groups by department is a must!
- Open the Outlook Express email client.
- On the Toolbar click on the 'Addresses' button, this opens a new 'Address Book' window.
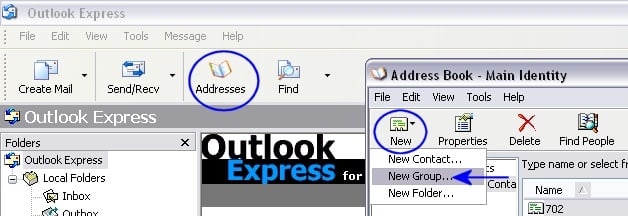
- In the new window click on the 'New' button, and from the options that appear choose 'New Group'. This will open a 'Properties' dialog box for a new Group.
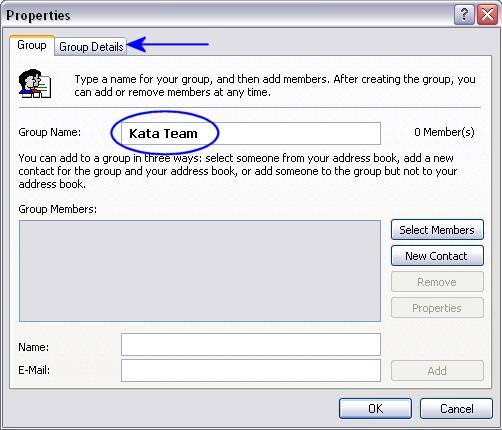
- Type in a Group name, in our example this will be Kata Team as shown.
- The 'Group Details' tab (arrowed) can be used to enter contact information for the Group, such as address, telephone number etc. if applicable.
To keep Alice's email address confidential you will need to create a second Group in the same way, with a name which indicates the email addresses contained are not to be distributed. In this example it is called Confidential.
Adding Members to a Group
As it says in the Group 'Properties' window there are three ways you can add 'Members' to a group, either:
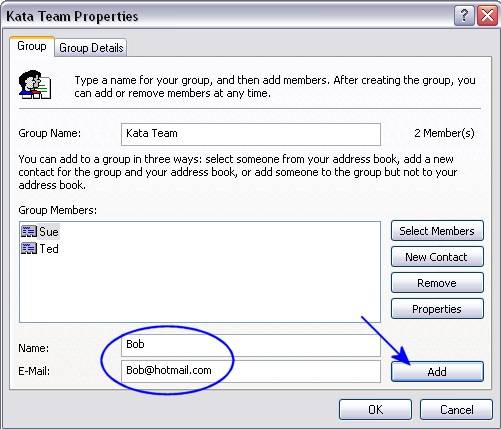
- Selecting them from existing entries in the address book using the 'Select Members' button, or:
- Make a new entry in the address book which will be added to the Group using the 'New Contact' button, or:
- Type in a name and email address which will be added to the group but not to the Address Book.
Mailing to a Group
In the main window click the 'Create Mail' button, this opens a 'New Message' window as usual.
Click on the address book icon beside the 'To:' button (arrowed) to open a 'Select Recipients' dialog box.
In the 'Select Recipients' dialog there is a list of your contacts shown, along with a search field to help you find a contacts name. One way to quickly find the 'Kata Team' entry is to click on any name in the 'Contacts' list and type "k" or "ka", unless you have a huge contact list the 'Kata Team' group should now be in the list.
- Highlight the 'Kata Team' entry (item ).
- Click the "To:->" button (item
 ) to put the 'Kata Team' in the 'To:' 'Message recipients' box.
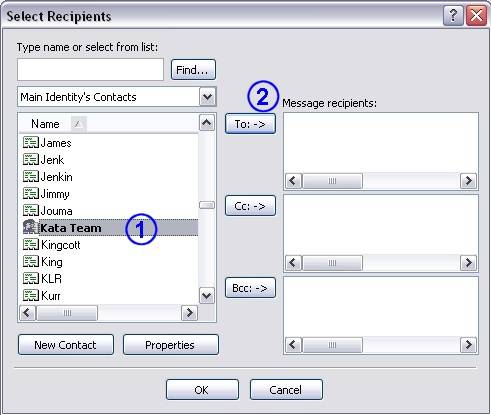
- Scroll or search the Contacts list to find the 'Confidential' group.
- Highlight the 'Confidential' entry (item )
- Click the "Bcc:->" button (item ) to put them in the 'Bcc:' 'Message recipients' box.
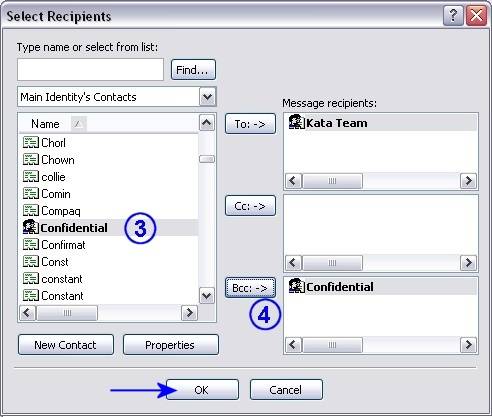
- Click 'OK'.
- The 'Select Recipients' dialog closes returning you to the 'New Message' window where you see "Kata Team" in the "To:" box and "Confidential" in the "Bcc:" box.
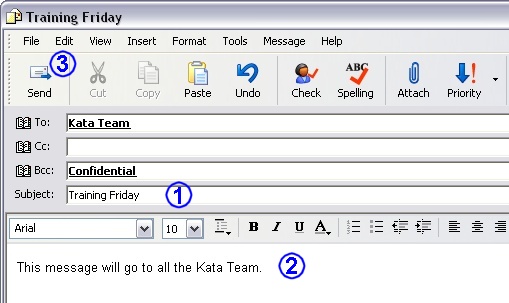
- As with any email, enter a message subject (item ).
- Enter the message to be sent to the Kata team (item
 ).
). - Click the 'Send" button on the toolbar. (item ).
If all the team's addresses were to be confidential then the whole Group could be put in the "Bcc:" box. When the email is sent it will then appear to be sent "To: undisclosed-recipients".
Outlook 2007 Time Saving Tips - Creating Email Groups :
Creating GroupsCreating your own Groups of email addresses is a handy function, as it allows you to send email to a pre-defined collection of people easily, without having to remember their names or email addresses. Whether you are on a server at work, trying to define a group of people to receive regular reports, or you want to set up a group at home to forward all your jokes to, this can save you a ton of time in the long run.
Part 1 – Creating your own Groups
If you are in the email view, click the Contacts button in the left navigation bar on your screen:
Now, you should be in the Contacts view. Choose Actions then New Distribution List (or press Ctrl+Shift+L)
Next, you’ll want to choose Select Members from the Members group on the Ribbon.
I’ve doubled clicked both Administrator and Citrix Resource Manager accounts, at which point they show in the “Members ->” area at the bottom of the screen. (Pick someone you actually want to email.) Once you’ve got a nice list of people that you’d like to include in your group, click OK.
Next, give your group a name that makes sense, and the click the Save & Close button on the Actions group.
Part 2 – Emailing Your Group
Okay, now the useful part… let’s send our group an email. From the New menu, choose Mail Message (or just press Ctrl+Shift+M to create a new mail message.)
In the email message, click the To… button:
The secret to finding your new group is to click the drop down arrow and choose the address book that holds the group you created. (In this case Outlook Contacts instead of our Global Address List):
And there it is! Double click it to select it, then click OK.
You’ll notice that your email is now addressed to the group. Now… do you remember who you put in the group? Okay, you probably do at this stage, but as time goes on, you may forget and want to verify it. (Or maybe it is your joke list, and you want to forward it to everyone except the person who just emailed the joke to you.) Do you see the little + sign just in front of the group name?
Go ahead and give it a click…
The email group automatically expands to show you the names of all of the members! You’ll never wonder who you’re sending email to again! And if you want to remove one, just highlight the name and press the delete key. It's just that easy!
Part 3 - Editing existing groups
Assume now that months have gone by, and you want to make a change to your group… either adding or removing someone. How do you do it? The first step is to located the group in your contacts list. Once you’ve found it, right click it, and choose Open.
Your "Distribution List" will open, and show who the members are.
Open Outlook and click on New Items \ More Items \ Contact Group.
This opens the Contract Group window. Give your group a name, click on Add Members, and select the people you want to add from your Outlook Contacts, Address Book, or Create new ones.
If you select from your address book you can scroll through and add the contacts you want. If you have a large amount of contacts you might want to search for them or use Advanced Find.
If you want to add a new email contact to your group, you’ll just need to enter in their display name and email address then click OK. If you want the new member added to your Contacts list then make sure Add to Contacts is checked.
After you have the contacts you want in the group, click Save & Close.
Now when you compose a message you should be able to type in the name of the Contact Group you created…
If you want to make sure you have everyone included in the group, click on the plus icon to expand the contacts. You will get a dialog box telling you the members of the group will be shown and you cannot collapse it again. Check the box not to see the message again then click OK.
Then the members of the group will appear in the To field. Of course you can enter a Contact Group into the CC or Bcc fields as well.
Add or Remove Members to a Contact Group
After expanding the group you might notice some contacts aren’t included, or there is an old contact you don’t want to be in the group anymore. Click on the To button…
Right-click on the Contact Group and select Properties.
Now you can go ahead and Add Members…
Or highlight a member and remove them…when finished click Save & Close.
If you need to send emails to several of the same people, creating Contact Groups is a great way to save time by not entering them individually. If you work in for a large company, creating Contact Groups by department is a must!