Windows XP CHKDSK (Disk Error Checking)
This is a in-built utility that checks installed Hard-Drives for problems and attempts to repair any of the following that may have occurred:
Note: Another method for this utility to be implemented is via the Recovery Console
Overall Description:
CHKDSK is a routine part of good machine maintenance. CHKDSK inspects and repairs file and folder integrity and the physical structure of a disk, correcting corruptions that can occur after system crash/freezes, power glitches, physical jarring and incorrectly turning off of the machine.
CHKDSK is most often useful just before running Disk Defragmentation because the Disk Defrag process may not be able to complete if file errors exist. It is also a good idea to run CHKDSK prior to installing any Service Pack.
Note: All physical hard drives have a small number of bad-sectors even when new. If CHKDSK regularly identifies additional bad-sectors or a large numbers of bad-sectors, it could be an early indicator predicting hard drive failure. If you find this to be the case with your machine's hard drive, consider data and file back-up solutions, run manufacturer's disk-health utilities and anticipate the possible need to replace the hard drive.
CHKDSK and Disk Defragmentation can be routinely run once monthly or every few months. More frequent scheduling is ordinarily not necessary and would only contribute to wear and tear of your hard drive. Some users run CHKDSK and Disk Defrag weekly. Your machine's needs and benefit from maintenance may vary.
CHKDSK may take from 30-40 minutes, up to a few hours, depending upon the size of your hard drive and the number of files installed or save on it.
Note: For this tutorial, it is assumed that C: is your Windows XP boot disk or partition.
If yours is different, replace C: in the following tutorial with the correct drive letter.
Graphical Mode:
Note: The images below denote both Windows Classisc style and Windows XP style.
Click on Start >> My Computer >> Right click on the C\: Drive icon - (Local Disk (C:) and select Properties
The following window will appear:


Now click on the Tools tab. The following window will appear:


Now click on the Check Now... tab. The following window will appear:


Select both check disk options and click on Start. Your computer will respond with:
 Reduced: 71% of original size [ 718 x 124 ] - Click to view full image

Reduced: 71% of original size [ 719 x 134 ] - Click to view full image

Click on the Yes button.
Next, click on Start >> Turn Off Computer >> Restart
Note: Upon Reboot(Restart), CHKDSK will start and carry out the repairs required.
You should see a screen like this just after the Post(power on self test) screen:
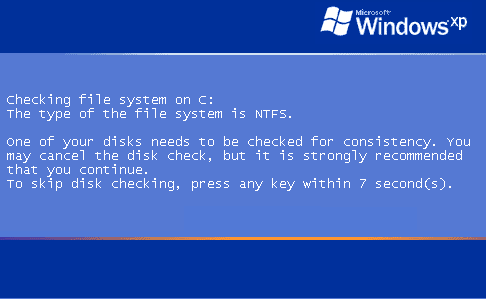
Note: Do not touch either the keyboard or Mouse, otherwise the CHKDSK will be canceled and you computer will continue to boot-up as normal.
Note: When CHKDSK has completed its scans, the machine will proceed to load and Boot to Windows, without need for the user to take any action.
Command Line Mode:
This can be run with two different "parameter switches": ( /f or /r )
To repair errors without scanning the volume for bad sectors, at the command prompt, type CHKDSK volume: /F and then press ENTER.
To repair errors, locate bad sectors, and recover readable information, at the command prompt, type CHKDSK volume: /R and then press ENTER. /R presumes to include actions of /F and adds sector recovery. /R is more thorough therefore scans take longer.
Note: /r is the recommended switch to use.
You should see a screen like this just after the Post(Power On Self Test) screen:
Note: Do not touch either the keyboard or mouse, otherwise the CHKDSK will be canceled and you computer will continue to boot-up as normal.
Note: When CHKDSK has completed its scans, the machine will proceed to load and Boot to Windows, without need for the user to take any action.
This is a in-built utility that checks installed Hard-Drives for problems and attempts to repair any of the following that may have occurred:
- Bad Sectors
- Lost Clusters
- Cross-Linked Files
- Directory Errors
Note: Another method for this utility to be implemented is via the Recovery Console
Overall Description:
CHKDSK is a routine part of good machine maintenance. CHKDSK inspects and repairs file and folder integrity and the physical structure of a disk, correcting corruptions that can occur after system crash/freezes, power glitches, physical jarring and incorrectly turning off of the machine.
CHKDSK is most often useful just before running Disk Defragmentation because the Disk Defrag process may not be able to complete if file errors exist. It is also a good idea to run CHKDSK prior to installing any Service Pack.
Note: All physical hard drives have a small number of bad-sectors even when new. If CHKDSK regularly identifies additional bad-sectors or a large numbers of bad-sectors, it could be an early indicator predicting hard drive failure. If you find this to be the case with your machine's hard drive, consider data and file back-up solutions, run manufacturer's disk-health utilities and anticipate the possible need to replace the hard drive.
CHKDSK and Disk Defragmentation can be routinely run once monthly or every few months. More frequent scheduling is ordinarily not necessary and would only contribute to wear and tear of your hard drive. Some users run CHKDSK and Disk Defrag weekly. Your machine's needs and benefit from maintenance may vary.
CHKDSK may take from 30-40 minutes, up to a few hours, depending upon the size of your hard drive and the number of files installed or save on it.
Note: For this tutorial, it is assumed that C: is your Windows XP boot disk or partition.
If yours is different, replace C: in the following tutorial with the correct drive letter.
Graphical Mode:
Note: The images below denote both Windows Classisc style and Windows XP style.
Click on Start >> My Computer >> Right click on the C\: Drive icon - (Local Disk (C:) and select Properties
The following window will appear:
Now click on the Tools tab. The following window will appear:
Now click on the Check Now... tab. The following window will appear:
Select both check disk options and click on Start. Your computer will respond with:
Reduced: 71% of original size [ 718 x 124 ] - Click to view full image Reduced: 71% of original size [ 719 x 134 ] - Click to view full imageClick on the Yes button.
Next, click on Start >> Turn Off Computer >> Restart
Note: Upon Reboot(Restart), CHKDSK will start and carry out the repairs required.
You should see a screen like this just after the Post(power on self test) screen:
Note: Do not touch either the keyboard or Mouse, otherwise the CHKDSK will be canceled and you computer will continue to boot-up as normal.
Note: When CHKDSK has completed its scans, the machine will proceed to load and Boot to Windows, without need for the user to take any action.
Command Line Mode:
This can be run with two different "parameter switches": ( /f or /r )
To repair errors without scanning the volume for bad sectors, at the command prompt, type CHKDSK volume: /F and then press ENTER.
To repair errors, locate bad sectors, and recover readable information, at the command prompt, type CHKDSK volume: /R and then press ENTER. /R presumes to include actions of /F and adds sector recovery. /R is more thorough therefore scans take longer.
Note: /r is the recommended switch to use.
- Click Start > Run... then type in CMD and click on OK.
- At the Command Prompt C:\ > type the following: chkdsk c: /r and hit the Enter/Return key.
Note: chkdsk c: /r presumes that the disk upon which you wish to run Error Checking is your C: Drive (most often) - When prompted with:
QUOTE
CHKDSK cannot run because the volume is in use by another process
Would you like to schedule this volume to be checked next time the system
restarts (Y/N)
Would you like to schedule this volume to be checked next time the system
restarts (Y/N)
- Hit the Y key then at the Command Prompt C:\ >
- Type in EXIT and and hit the Enter/Return key.
- Now Reboot(Restart) your computer.
You should see a screen like this just after the Post(Power On Self Test) screen:
Note: Do not touch either the keyboard or mouse, otherwise the CHKDSK will be canceled and you computer will continue to boot-up as normal.
Note: When CHKDSK has completed its scans, the machine will proceed to load and Boot to Windows, without need for the user to take any action.
Running CHKDSK from the Windows CD
- Insert your Windows XP CD into your computer's CD-ROM drive and restart your computer. If your computer is not booting into Windows, you will still need to have your computer powered on to open the CD-ROM drive and insert the CD before restarting.
- Many newer computers are set to boot CDs by default or have an
option to temporarily change the boot order. Look for one of these
messages as your computer starts:
- F12 (or another key) = Boot Menu
- ESC (or another key) to select boot device
- Press any key to boot from CD
- If you needed to press a key for a boot menu or to select a boot device, you should now have a menu of the devices your computer can try to boot from. Choose your CD-Rom drive and press Enter.
- When you see the "Press any key" message, your computer is ready to boot from the Windows XP CD. Just press Enter. Your system will load files and bring you to the Windows XP Setup screen.

- At the Windows Setup screen, press R to enter the Recovery Console.
- NOTE: If you are unable to access the recovery console, your CD may be damaged, or the problem could be more severe and require professional system recovery.
- You will enter the Recovery Console and be asked to choose which
Windows installation you would like to log into. Most users will only
have one choice.

- You will be prompted to enter the administrator password. This is the password set for the user Administrator. You may have set this password when you first were configuring your computer. If you are uncertain what password to enter here, try leaving the line blank and just pressing ENTER.
-
You will be presented with a C: prompt. Type the following:
chkdsk /r
and press ENTER.

- CHKDSK will now run. The scan may run for several hours.
- When the scan is complete, a report will display. If any errors appear, contact the DoIT Help Desk.
- To leave the Recovery Console and reboot your computer, type exit and press Enter. Remember to eject your Windows XP CD before your system tries to boot off of it.
Running CHKDSK from the Windows Desktop
- Click on the Start Menu then Run.
- Type in cmd and click OK
-
You will be presented with a C: prompt. Type the following:
chkdsk volume:/r
where volume is the disk you would like to check. Most users will probably need to scan the C: drive, however, the volume you scan depends on your computer's configuration and the problems you are experiencing. Press ENTER to initiate the scan.

- CHKDSK will now run. The scan may run for several hours.
- When the scan is complete, a report will display