Postfix Flush the Mail Queue

Postfix flush mail queue :

Category: Linux / Tag: mail queue, mailq, postfix, postfix mail queue, postsuper, sendmail / Add Comment

We all know that the command `sendmail -q` will flush the mails in queue. In Postfix, enter the following to flush the mail queue:

# postfix flush

Or you can use:

# postfix -f

To see mail queue, enter:
# mailq

To remove all mail from the queue:
# postsuper -d ALL

To remove all mails in the deferred queue:
# postsuper -d ALL deferred

How to shutdown Windows using the command prompt

  1. Start the command prompt by typing cmd in the start menu.
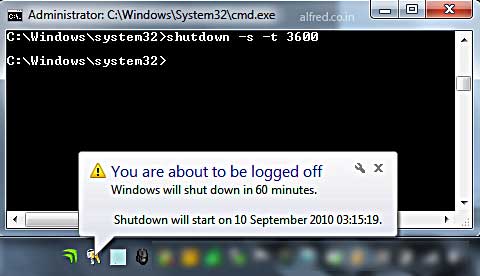
  2. Type in shutdown -s -t 3600
The shutdown command has many parameters that can be used for different purposes. In the example above -s means shutdown and -t 3600 means the timer will run for 3600 seconds or 1 hour.

If you wants to cancel a shutdown that was initiated type in shutdown -a. You can then change the shutdown timer and set a new time. Other commands like -r to restart, -l to logoff and -e to hibernate might the useful to you. Incase you have any doubts about using this command just enter shutdown ? to see the help for the command.

Alternate method to schedule a Windows shutdown timer using the AT command

This method requires that you have administrator rights while running the command prompt. Type cmd in start, right click on the cmd.exe and choose Run as administrator. Now you can use the AT command to schedule a task that can be run repetitively or a single time. Enter the command like the example below.
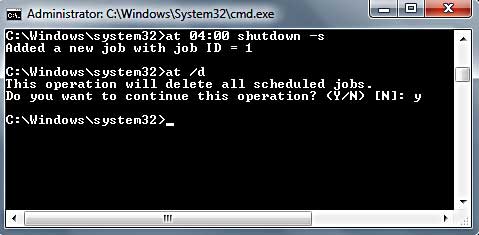
at 08:00 shutdown -s
This will make your computer shutdown at 8am. (Note make sure no previous logoff timer is running if u used the method above). The /d command can be used to delete any timers that you made.

Make a shutdown button / file

Open Notepad, enter the commands as shown in the first example
“shutdown.exe -s -t 3600″
Now save this file as shutdown.bat. any name just add .bat to the end.
Now you can just double click this file anytime to run the command. You can also go to the files properties and assign a keyboard shortcut if you want.

Password protect documents, workbooks, and presentations

Set a password in a Word document

To encrypt your file and set a password to open it:
  1. Click the Microsoft Office Button Button image, point to Prepare, and then click Encrypt Document.
Encrypt Document
  1. In the Encrypt Document dialog box, in the Password box, type a password, and then click OK.
You can type up to 255 characters. By default, this feature uses AES 128-bit advanced encryption. Encryption is a standard method used to help make your file more secure.
  1. In the Confirm Password dialog box, in the Reenter password box, type the password again, and then click OK.
  2. To save the password, save the file.
Top of Page Top of Page

Remove password protection from a Word document

  1. Use the password to open the document.
  2. Click the Microsoft Office Button Button image, point to Prepare, and then click Encrypt Document.
  3. In the Encrypt Document dialog box, in the Password box, delete the encrypted password, and then click OK.
  4. Save the file.
Top of Page Top of Page

Set a password to modify a Word document

In addition to setting a password to open a Word document, you can set a password to allow others to modify the document.
  1. Click the Microsoft Office Button Button image, click Save As, and on the bottom of the Save As dialog, click Tools.
  2. On the Tools menu, click General Options. The General Options dialog opens.
  3. Under File sharing options for this document, in the Password to modify box, type a password.
  4. In the Confirm Password dialog, re-type the password. Click OK.
  5. Click Save.
 Note   To remove the password, repeat these instructions and then delete the password from the Password to modify box. Click Save.
Top of Page Top of Page

Set a password in an Excel spreadsheet

To encrypt your workbook and set a password to open it:
  1. Click the Microsoft Office Button Button image, point to Prepare, and then click Encrypt Document.
Encrypt Document
  1. In the Password box, type a password, and then click OK.
You can type up to 255 characters. By default, this feature uses AES 128-bit advanced encryption. Encryption is a standard method used to help make your file more secure.
  1. In the Reenter password box, type the password again, and then click OK.
  2. To save the password, save the file.
Top of Page Top of Page

Remove password protection from an Excel spreadsheet

  1. Use the password to open the spreadsheet.
  2. Click the Microsoft Office Button Button image, point to Prepare, and then click Encrypt Document.
  3. In the Encrypt Document dialog box, in the Password box, delete the encrypted password, and then click OK.
  4. Save the spreadsheet.
Top of Page Top of Page

Set a password to modify an Excel spreadsheet

In addition to setting a password to open an Excel spreadsheet, you can set a password to allow others to modify the spreadsheet.
  1. Click the Microsoft Office Button Button image, click Save As, and on the bottom of the Save As dialog, click Tools.
  2. On the Tools menu, click General Options. The General Options dialog opens.
  3. Under File sharing, in the Password to modify box, type a password.
  4. In the Confirm Password dialog, re-type the password. Click OK.
  5. Click Save.
 Note   To remove the password, repeat these instructions and then delete the password from the Password to modify box. Click Save.
Top of Page Top of Page

Set a password for a PowerPoint presentation

To encrypt your presentation and set a password to open it:
  1. Click the Microsoft Office Button Button image, point to Prepare, and then click Encrypt Document.
Encrypt Document
  1. In the Password box, type a password, and then click OK.
You can type up to 255 characters. By default, this feature uses AES 128-bit advanced encryption. Encryption is a standard method used to help make your file more secure.
  1. In the Reenter password box, type the password again, and then click OK.
  2. To save the password, save the file.
Top of Page Top of Page

Remove password protection from a PowerPoint presentation

  1. Use the password to open the presentation.
  2. Click the Microsoft Office Button Button image, point to Prepare, and then click Encrypt Document.
  3. In the Encrypt Document dialog box, in the Password box, delete the encrypted password, and then click OK.
  4. Save the presentation.
Top of Page Top of Page

Set a password to modify a PowerPoint presentation

In addition to setting a password to open a PowerPoint presentation, you can set a password to allow others to modify the presentation.
  1. Click the Microsoft Office Button Button image, click Save As, and on the bottom of the Save As dialog, click Tools.
  2. On the Tools menu, click General Options. The General Options dialog opens.
  3. Under File sharing settings for this document, in the Password to modify box, type a password.
  4. In the Confirm Password dialog, re-type the password. Click OK.
  5. Click Save.
 Note   To remove the password, repeat these instructions and then delete the password from the Password to modify box. Click Save.

Another easy way forpassword Protection
On the Review tab, in the Changes group, click Protect Sheet.

Excel Ribbon Image
  1. In the Allow all users of this worksheet to list, select the elements that you want users to be able to change.
  1. In the Password to unprotect sheet box, type a password for the sheet, click OK, and then retype the password to confirm it.
 Note   The password is optional. If you do not supply a password, then any user can unprotect the sheet and change the protected elements. Make sure that you choose a password that is easy to remember, because if you lose the password, you cannot gain access to the protected elements on the worksheet.

How to share an Excel spreadsheet between multiple users


For office XP & office 2003 :
To share an Excel spreadsheet, select Share Workbook under the Tools menu.

When the Share Workbook window appears, click on the checkbox to allow changes by more than one user at the same time.

Click on the Advanced tab. You can then customize the options. Click on the OK button.

The following message should appear. Click on the OK button.

Now when you return to the spreadsheet, you should see [Shared] at the end of the file name. This indicates that the Excel file is set up as a shared workbook.


Use a shared workbook for office 2007 :

On the Review tab, in the Changes group, click Share Workbook.

Excel Ribbon Image 
On the Editing tab, select the Allow changes by more than one user at the same time. This also allows workbook merging check box.

On the Advanced tab, select the options that you want to use for tracking and updating changes, and then click OK.

Do one of the following:
    • If this is a new workbook, type a name in the File name box.
    • If this is an existing workbook, click OK to save the workbook, click Microsoft Office Button Button image, and then click Save As.

Enabling Multiple Remote Desktop Sessions In Windows XP Professional

Windows XP SP3 – Enabling Remote Desktop With Network Level Authentication

In a previous post I set up Windows Vista SP1 to enable concurrent Remote Desktop sessions. This means that mutiple users can be logged in to my Vista machine via remote desktop at the same time. What I did not mention was that had also I enabled Network Level Authentication (NLA) for extra security.

The problem is that Windows XP SP3 does not support NLA out-of-the-box. Some tweaking in the registry is required to enable it (from the Microsoft KnowledgeBase article):
  • Click Start, click Run, type regedit, and then press Enter.
  • In the navigation pane, locate and then click the following registry subkey:
    HKEY_LOCAL_MACHINE\SYSTEM\CurrentControlSet\Control\Lsa
  • In the details pane, right-click Security Packages, and then click Modify.
  • In the Value data box, type tspkg. Leave any data that is specific to other SSPs, and then click OK.
  • In the navigation pane, locate and then click the following registry subkey:
    HKEY_LOCAL_MACHINE\SYSTEM\CurrentControlSet\Control\SecurityProviders
  • In the details pane, right-click SecurityProviders, and then click Modify.
  • In the Value data box, type credssp.dll. Leave any data that is specific to other SSPs, and then click OK.
  • Exit Registry Editor.
  • Restart the computer.
So all-in-all a pretty quick fix that helps maintain the security of my Vista computer!
Up until now I have been using FreeNX on Ubuntu to enable multiple remote sessions to a central virtual machine running Wine and Office 2003 / 2007.FreeNX has been great but I have had issues trying to access on-line templates in Word and have yet to look hard enough for a way to install service packs for Office. Ideally I wanted concurrent Remote Desktop (RDP ) sessions on Windows 7 but have settled for the following hack on Windows XP Professional (SP3) to do the job.
Note that I performed the following actions on a clean install of XP Professional SP3 (connected to a Workgroup) with Remote Desktop not yet enabled:
First download termsrv.dll (version 5.1.2600.5512).
Next make a backup of the termsrv.dll files in the following locations:
  • C:\Windows\System 32\
  • C:\Windows\System 32\dllcache
  • C:\Windows\ServicePackFiles\i386
Unzip the termsrv.dll zip file that you downloaded and copy it to the above locations. If you experience issues copying these files you may need to disable the Terminal Services service and then boot in to Safe Mode (press F8 during boot) to complete this task.
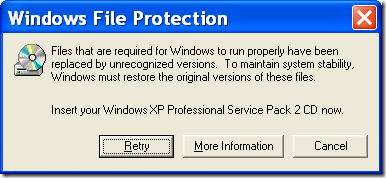
If you see the following file protection error just click Cancel:

The next step is to make some changes to the Windows Registry with the ts_multiple_sessions.zip file. Unzip the file and double click on the .bat file to make the necessary registry changes.
If you want to review the changes that this file will make before running it you can just right click it and then select Edit.
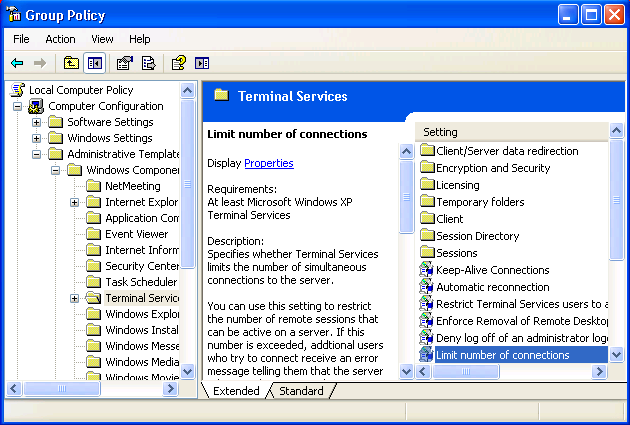
Now we just need to define the number of concurrent remote desktop connections / sessions that we want to enable. Click Start then Run and type gpedit.msc and then click OK. In the Group Policy window expand Computer Configuration, Administrative Templates, Windows Components and then Terminal Services in the left pane. In the right pane double click on Limit number of connections and define the number of remote desktop sessions.

To finish up we just need to make sure that we turn on Remote Desktop and enable Fast User Switching as follows.
  • Click Start, Control Panel and then System. Click the Remote tab and then click the Allow users to remotely connect to this computer check-box. Keep this window open.
  • In Control Panel click User Accounts. Under the Pick a task heading click Change the way users log on or off and make sure that Use Fast User Switching is enabled.
In User Accounts you can also add any additional user accounts that you want to have remote desktop access. Just make sure to that you enable these users in the Remote tab of the System window by clicking the Select Remote Users button and then adding the users one by one.

Enable Multiple User Access/Concurrent User Sessions For Remote Desktop on Windows 7

Windows 7 has better access control then vista and XP and with user account control all the process are launched in protected mode even if you logged in as administrator. In case if you have installed windows 7 on another computer present in your network then only way to access it from your own machine is using remote desktop.
But if some one already logged on windows 7 then you wont be able to login as windows 7 by default doesn’t allow concurrent sessions. If you try to login to windows 7 while another users is already logged in locally or remotely then a message will be displayed as show in below screenshot.
Remote Desktop on Widnows 7
Only one user can login to windows 7. Well don’t worry some one has already found the way to allow multiple user login to windows 7 i.e Concurrent User Sessions. Here is guide to enable concurrent user sessions on Windows 7.
Lets begin,

First, Download the Patch Here


Click "Save" to save the download.


For easy access, save the download to the desktop.  To do this, click "Desktop" on the left side of the Save As window and then click "Save" in the bottom right corner.  Once the download completes, click "Open" or look on the desktop for Win7RDP.zip, double-click to open the compressed file.


Inside of the Win7RDP.zip window you will find the 4 files needed for this patch.  Click "Extract all files" at the top of the window.


The Extract Compressed (Zipped) Folders wizard will then start.  Erase the text from the extract to field and type in "C:\Win7RDP." Click on the box next to "Show extracted files when complete" to automatically open the extracted folder after extraction. Once completed, click "Extract" at the bottom.


The extracted Win7RDP folder will open automatically after extraction. If not, open the Start Menu, click "Computer," double-click "Local Disk (C:)" and then double-click the Win7RDP folder.

Inside the Win7RDP folder you will see install.cmd, right-click on install.cmd and then click on "Run as administrator" to launch the patch as an administrator.


The rest of the patching process is automated.  The install.cmd will take ownership and replace RDPs termsrv.dll with either the 32 or 64 bit patched version. Next it will update the remote desktop protocol rules, enable remote desktop and start the remote desktop services. The entire install.cmd runs in a split second, press any key to close the window.

How to enable automatic logon for Windows 7 and Vista

Description
Auto login in Windows 7 & Windows Server 2008 allows a user to logon direct into his Windows desktop without having to enter the password.
However, this can be possible for only one user on the Server and multiple users cannot have this feature enabled.
Resolution
To enable Auto login in Windows 7 & Windows Server 2008
  1. Click Start, search for “netplwiz.exe″ and press enter.
  2. Disable -Users must enter a user name and password to use this computer-


How to make Windows XP as a Router

IP Forwarding - How to make Windows XP as a Router 

Do you aware that enabling IP forwarding using Windows XP Professional will make it as a simple router, so that you can have 2-3 different networks at home and those computers manage to talk to each other from different network. The router is needed to send/receive the traffic from one network to another network or access Internet. The benefit is you don’t have to buy additional router and so can save some money. This approach is not so common practiced in Windows XP, but it works.
As an example, let say you have 7 computers and 2 network switches, and need to create 2 networks that can access Internet, so how to do it?? Some more information, one of the computers is equipped with 3 network cards and one of the network cards is connected to cable/DSL modem to access Internet, so this computer will act as a router!

XP Router Network
Configure the network cards on the router with following information.
Router (Windows XP Professional)
Network Card A (connect to network A):
IP: 10.10.10.1
Netmask: 255.255.255.0
Gateway (GW): [leave it blank]
Network Card B (connect to network B):
IP: 192.168.20.1
Netmask: 255.255.255.0
Gateway (GW): [leave it blank]
Network Card C (connect to Internet via cable/dsl connection)
This information will be based on the Internet connection service which you have subscribed.
IP: 192.168.1.1
Netmask: 255.255.255.0
Gateway (GW): 192.168.1.1
Configure all the computers in network A with following information.
Network A
IP: 10.10.10.2-254
Netmask: 255.255.255.0
Gateway (GW): 10.10.10.1
Configure all the computers in network B with following information.
Network B
IP: 192.168.20.2-254
Netmask: 255.255.255.0
Gateway: 192.168.20.1
Ok.. Now it’s the time to configure IP forwarding on that router…
1) Go to Start and click Run…, then type in regedit to run registry editor.
regedit
Note: Please note that only System Administrator can run registry editor.
2) Registry editor window will appear. Browse for the following registry key at the left hand side window:
HKEY_LOCAL_MACHINESYSTEMCurrentControlSetServicesTcpipParameters
Right click IPEnableRouter registry object, and click Modify.
Note: Be extra careful when you deal with registry editor, wrong editing will crash you Windows OS.
IPEnableRouter
3) The IPEnableRouter window will appear. Type 1 as Value data and click OK.
IP Forwarding
4) Close the regisrty editor and reboot the computer. After rebooting, all the computers should be able to access Internet and also share the file/printer between network A and B.
Note: When I did the test, IP forwarding will only work after rebooting the computer. So don’t forget to do it.
Windows 7 Remote Desktop Activation

  1. Enabling Remote Desktop on Windows 7

    1) As usual, go to Start, right click Computer and then click on Properties.

    2)To get to the configuration page, you can either right-click the Computer icon and choose Properties.If you don’t like this way, you can also open this window by going to Control Panel -> System and Security -> System.

    3) Proceed to click on Remote tab in System Properties window, this is the location you could enable this Remote Desktop access feature. Click on Allow connections from computers running any version of Remote Desktop (less secure) option if your Remote Desktop client doesn’t support Network Level Authentication.
    You are also required to click Select Users button to choose the users that can connect to this computer remotely. Continue to read more below before clicking Apply and OK button.


    Select "Allow connection from computers running any version of Remote Desktop (less secure)"
    Click OK

    Note: I highly recommend you to choose that Allow connections only from computers running Remote Desktop with Network Level Authentication (more secure) option if your Remote Desktop client supports that Network Level Authentication. If you want to check, just open the client (Start->All Programs->Accessories->Remote Desktop Connection) and click on upper left corner icon to open the About window, you will then find out whether it’s supported.

    check remote desktop client Windows 7 - Network Level Authentication
    Note: If you click Select Users button in system Properties window, you can add the users that can connect to this computer remotely. By default the current user id that you use to enable this Remote Desktop will be allowed to connect remotely (which is Ivan the current logged on user in this case). You can click Add... to add other users.
    select users for remote desktop
    Note: Please note that the Remote Desktop must be enabled (in your respective network location type) as exception in Windows Firewall, so that this Remote Desktop traffic will be permitted by firewall! If not this Remote Desktop traffic will be dropped by this firewall.
    allow remote desktop traffic on firewall
    Note: Please also make sure Block all incoming connections, including those in the list of allowed programs check box is not enabled in Windows firewall! If it’s check, then no remote connection can be made from other computers.
    windows firewall customized settings


    How to Connection Remote Desktop in Windows 7

    Solution
    1. First enable your computer 's remote desktop service. Right click on the computer icon and choose manage menu.
      How to Connection Remote Desktop in Windows 7
    2. Enable your computer 's remote desktop service. In the Computer Management dialog box, expand it to services.  In the right panel ,choose remote desktop service ,right click on it and  choose start.
      How to Connection Remote Desktop in Windows 7
    3. Open Start Menu , go to All Programs\Accessories, Choose Remote Desktop Connection.
      How to Connection Remote Desktop in Windows 7
    4. Type  IP address or the Computer Name of the computer you want to connect to in the computer box in General tabs . Here you can configure your settings. Choose each tabs to configure your settings. 
      • General:  Here you can enter the computer name you want to connect and save the settings; 
        How to Connection Remote Desktop in Windows 7
      • Display: Here you can set display size of the remote desktop and color display on your own screen;
        How to Connection Remote Desktop in Windows
      • Local Resources: Here you can set  whether or not using the romote audio ,  Keyboard and local resources when you are using remote desktop connection.
        How to Connection Remote Desktop in Windows
      • Programs: You can set the Start the program when you on connection.
        How to Connection Remote Desktop in Windows
      • Experience: Here you can optimize the performance accordingly your environment.All the following display the ation you can use basing on your choice; 
        How to Connection Remote Desktop in Windows
      • Advanced: Here you can carry some settings associated with Server and Connect from anywhere.   
        How to Connection Remote Desktop in Windows 7
    5. Choose Connect.
      How to Connection Remote Desktop in Windows 7
    6. You may need to input the password of the user name.
      How to Connection Remote Desktop in Windows 7
    7. Now we can connect remote desktop .
      Connection Remote Desktop


    Setting Up Remote Desktop Another Easy Procedure
     
    1. Go to Start (the Orb) > Control Panel > User Accounts
    setup-remote-7
    2. In the Control Panel, click on the System and Security link

    setup-remote-7b
    3. Under System click on Allow remote access
    setup-remote-7c
    4. Select Allow connections only from computers running Remote Desktop with Network Level Authentication under Remote Desktop. Click Apply.
    Note: If you would like to connect using a computer that does not support Network Level Authentication choose Allow connections from computers running any version of Remote Desktop.
    setup-remote-7e
    5. Click on the Select Users… button and click the Add button in the Remote Desktop Users window.
    setup-remote-7f
    6. Click the Advanced… button in the Select Users window, click on the Find Now button to locate the users that you would like to grant access to via Remote Desktop, click on the user and click OK when done.
    setup-remote-7g
    7. Click OK 3 times to exit all of the dialog boxes.
    Your Windows 7 Machine is now ready to be connected via Remote Connection.
    Connecting to a Remote Desktop
    This section will walk you through the process of connecting to a remote desktop on your network.
    setup-remote-7h
    1. Go to Start (the Orb) > All Programs > Accessories > Remote Desktop Connection
    setup-remote-7i
    2. Type the address of the remote computer in the Computer: text box, click Connect
    Note: I connected to a computer located on my network
    setup-remote-7j
    3. Sign-on to the computer when prompted for credentials.