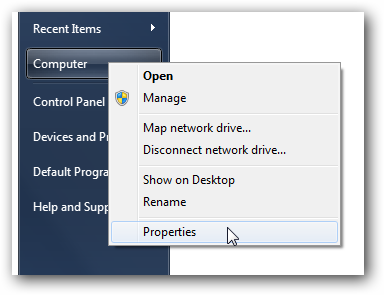
1) As usual, go to
Start, right click
Computer and then click on
Properties.
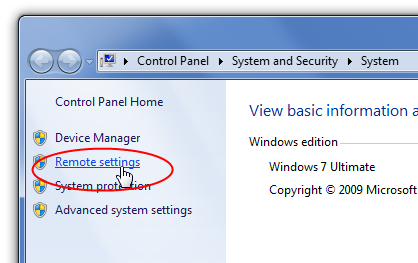
2)To get to the configuration page, you can either right-click the
Computer icon and choose
Properties.If you don’t like this way, you can also open this window by going to
Control Panel -> System and Security -> System.
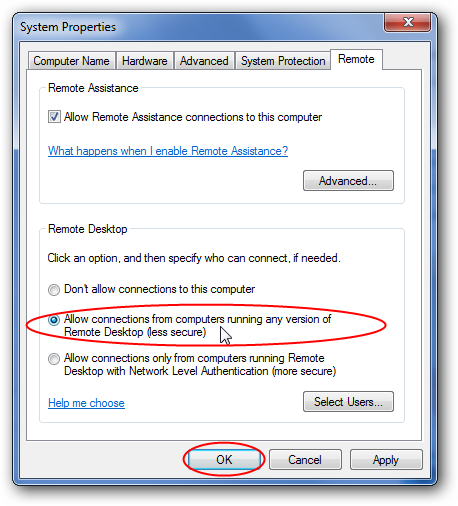
3) Proceed to click on
Remote tab in
System Properties window, this is the location you could enable this Remote Desktop access feature. Click on
Allow connections from computers running any version of Remote Desktop (less secure) option if your Remote Desktop client doesn’t support Network Level Authentication.
You are also required to click
Select Users button to choose the users that can connect to this computer remotely. Continue to read more below before clicking
Apply and
OK button.
Select "
Allow connection from computers running any version of Remote Desktop (less secure)"
Click
OK
Note: I highly recommend you to choose that Allow connections only from computers running Remote Desktop with Network Level Authentication (more secure) option if your Remote Desktop client supports that Network Level Authentication. If you want to check, just open the client (Start->All Programs->Accessories->Remote Desktop Connection) and click on upper left corner icon to open the About window, you will then find out whether it’s supported.
 Note:
Note: If you click
Select Users button in system Properties window, you can add the users that can connect to this computer remotely. By default the current user id that you use to enable this Remote Desktop will be allowed to connect remotely (which is Ivan the current logged on user in this case). You can click
Add... to add other users.
 Note:
Note: Please note that the Remote Desktop must be enabled (in your respective network location type) as exception in Windows Firewall, so that this Remote Desktop traffic will be permitted by firewall! If not this Remote Desktop traffic will be dropped by this firewall.
 Note:
Note: Please also make sure
Block all incoming connections, including those in the list of allowed programs check box is not enabled in Windows firewall! If it’s check, then no remote connection can be made from other computers.

Solution
- First enable your computer 's remote desktop service. Right click on the computer icon and choose manage menu.
- Enable your computer 's remote desktop service. In the Computer Management dialog box, expand it to services. In the right panel ,choose remote desktop service ,right click on it and choose start.
- Open Start Menu , go to All Programs\Accessories, Choose Remote Desktop Connection.
- Type IP address or the Computer Name of the computer you want to connect to in the computer box in General tabs . Here you can configure your settings. Choose each tabs to configure your settings.
- General: Here you can enter the computer name you want to connect and save the settings;
- Display: Here you can set display size of the remote desktop and color display on your own screen;
- Local Resources: Here you can set whether or not using the romote audio , Keyboard and local resources when you are using remote desktop connection.
- Programs: You can set the Start the program when you on connection.
- Experience: Here you can optimize the performance accordingly your environment.All the following display the ation you can use basing on your choice;
- Advanced: Here you can carry some settings associated with Server and Connect from anywhere.
- Choose Connect.
- You may need to input the password of the user name.
- Now we can connect remote desktop .
Setting Up Remote Desktop Another Easy Procedure
1. Go to Start (the Orb) > Control Panel > User Accounts
 2.
2. In the
Control Panel, click on the
System and Security link
 3.
3. Under
System click on
Allow remote access
 4.
4. Select
Allow connections only from computers running Remote Desktop with Network Level Authentication under
Remote Desktop. Click
Apply.
Note: If you would like to connect using a computer that does not support Network Level Authentication choose Allow connections from computers running any version of Remote Desktop.
 5.
5. Click on the
Select Users… button and click the
Add button in the
Remote Desktop Users window.
 6.
6. Click the
Advanced… button in the
Select Users window, click on the
Find Now button to locate the users that you would like to grant access to via Remote Desktop, click on the user and click
OK when done.
 7.
7. Click OK 3 times to exit all of the dialog boxes.
Your Windows 7 Machine is now ready to be connected via Remote Connection.
Connecting to a Remote Desktop
This section will walk you through the process of connecting to a remote desktop on your network.

1. Go to
Start (the Orb) > All Programs > Accessories > Remote Desktop Connection

2. Type the address of the remote computer in the
Computer: text box, click
Connect
Note: I connected to a computer located on my network

3. Sign-on to the computer when prompted for credentials.


