For VPN Server configuration you need to enable port forwarding to your local IP(For pptp we use 1723 port)
Windows 7 PPTP VPN Server Setup :
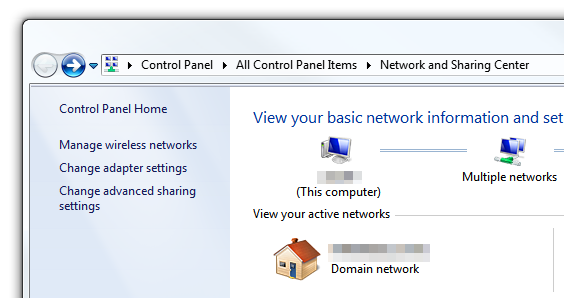
1 Go to Start2 Click on Change adapter settings. There you will find your different network adapters.
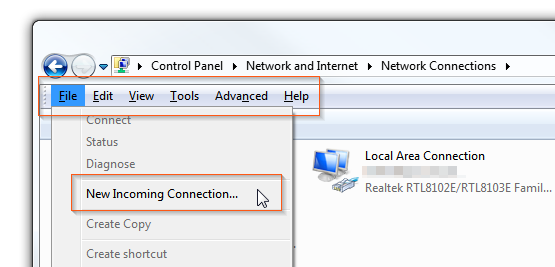
Press the Alt key on your keyboard to bring the Windows 7 menu bar. Then go to File and select New incoming connection.
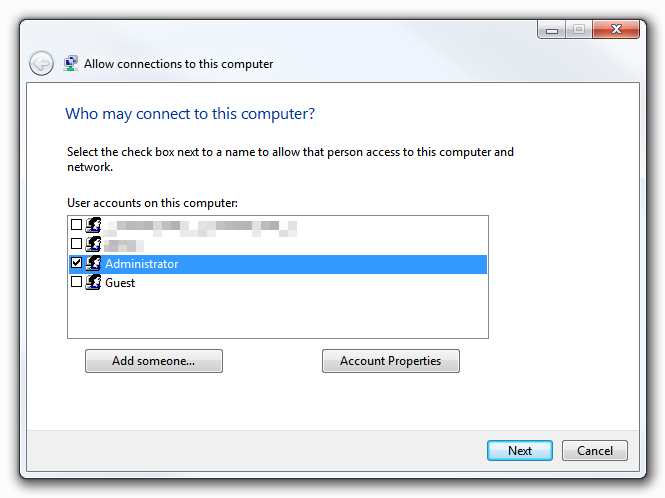
3 What you do here is to tell your computer which users are allowed to connect. Select the Windows 7 user account that you want to allow to connect via VPN or click the Add someone to create a VPN user account.
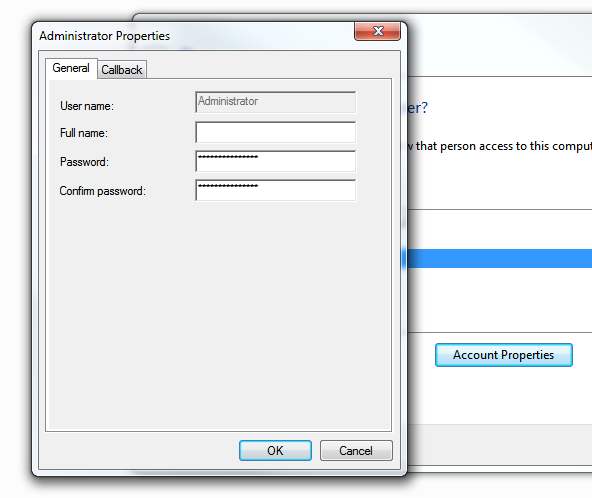
Then you can additionally, click Account Properties to change some properties, such as full name, configure different password for VPN and Callback settings. Click the Next button to continue.
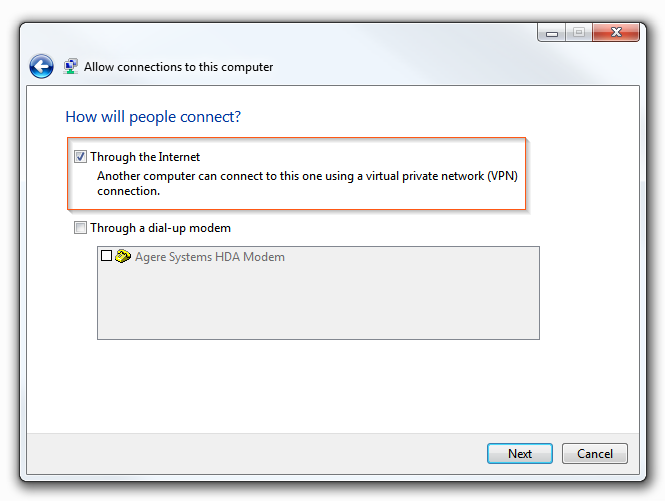
4 In the next step, How will people connect? check the box Through the Internet and click the Next button.
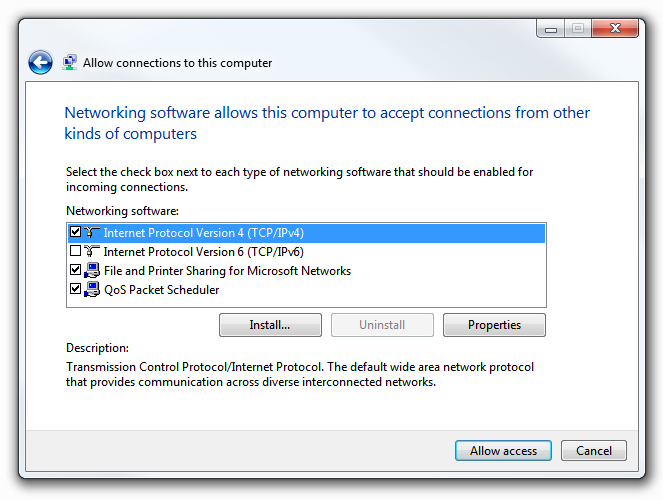
5 Next leave the default settings as they are, select Internet Connection Version 4 (TCP/IPv4) and click Properties.
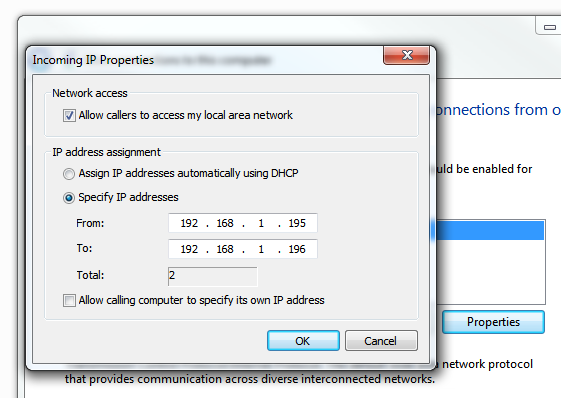
There, make sure that the setting Allow callers to access my local area network is checked. In the IP address assignment section, select Specify IP addresses – basically here you are telling Windows 7 what IP address to hand over to the computer that connect to the VPN server –, choose a high-order IP address range to give out to the computers allowed to connect, where no computer has been assigned before to avoid possible IP address conflict in the future (see image below for reference). Click OK and then click the Allow Access button, and let Windows finish the process.
Note that the built-in VPN server in Windows 7 only allows one connection at a time, which for most situations is more than enough.
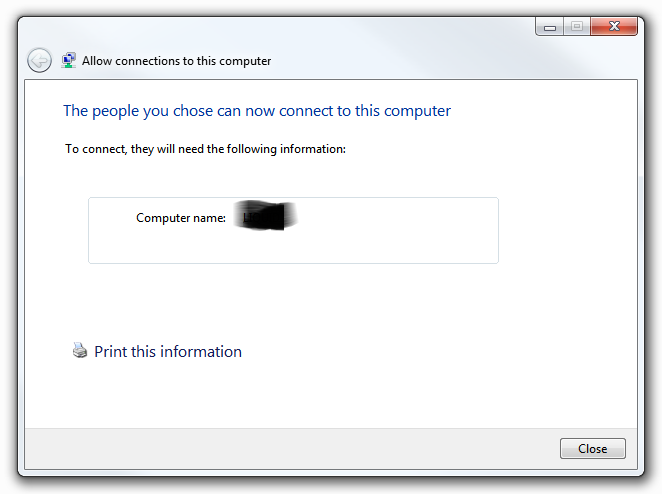
When you click the Close button in the Allow connections to the computer (VPN server) wizard and if everything was completed successfully, you will see a new item appeared in the Network Connections page called Incoming Connections. Now the server portion is completed.

Step Four
You are now ready to easily contact your home network and to connect to the computer serving VPN access. In this fourth and last step, you need to configure the computer that is going to connect to the VPN server; to do this follow the step-by-step guide from this previous article How to set up a VPN connection in Windows 7.
Remember to write down your DDNS, this is your Domain Name to contact your VPN server and the username and password for the account that is allowed to connect. You will need this information when configuring the VPN connection.
After you have completed setting up the VPN connection from the article I just mentioned above, go back to Network Connections:
- Right-click the VPN connection and select Properties.
- Navigate to the Security tab and make sure that Type of VPN is set to Point to Point Tunneling Protocol (PPTP) option and Data encryption is set to Maximum strength encryption (disconnect if server declines).
- Click the OK button to save the settings.
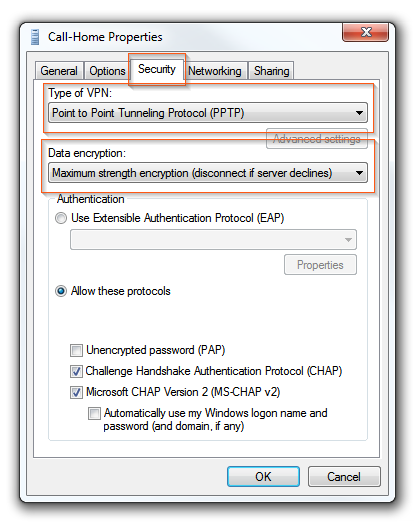
I would recommend you to configure and test the VPN connection to make sure everything is working correctly, before trying to connect from a remote location.
Windows 7 PPTP VPN Client Setup
1) Go to Start and click on Control Panel.
2) Proceed to click View network status and tasks in Control Panel window.

3) Network and Sharing Center window will appear, proceed to click on Set up a new connection or network.

4) Set up a Connection or Network window appears. Choose Connect to a workplace option and click Next.

5) Proceed to click on Use my Internet connection (VPN) (your computer should have connected to network).

6) Let’s type the IP address or host name of the VPN server computer that you plans to connect to and also name the connection. Most of the time the IP address is the public WAN IP of your home network’s DSL/cable Internet connection if the VPN server is located behind your home router. Click Next.
Note: Check this what is my WAN IP article if not too sure about WAN IP of your home network's Internet connection.
Note: Tick that Don’t connect now; just set it up so I can connect later option if you are not ready to establish the VPN connection yet. You can also tick other options if it’s applicable.

7) Type your VPN user name and password, after that click Create.
Note: For safety concern, don’t tick Remember this password option.

8) Ok! Now the VPN connection is ready to use, just click Connect now to establish the VPN connection if you are ready. If not, click Close and connect it later.

9) If you click on network icon (right hand corner of taskbar area), you will notice that new VPN connection item is created and you can click Connect to establish VPN connection.
Note: You can also right click the VPN connection and click on Properties in order to configure this connection in details as needed.

Note: If you open VPN connection properties, you can make further VPN configuration. The security tab also shows you the supported VPN types (Automatic is default setting)
